How to manage products using GQL
22 minute read
What you’ll learn
- What an Advert is and its primary components
- How to use the advertUpsert mutation to create adverts
Updating adverts is briefly covered in this guide, but is covered in more detail here
Background reading
This is a detailed guide on how to use the Operator API to create products, however before diving into the detail, you may find this primer document useful.What is an Advert?
An Advert is essentially analogous to a Product (so it’s maybe easier to think about it that way). An Advert has the following characteristics:
- Adverts are created, and placed for sale on the Marketplace most usually by a Seller.
- Operators can however create products on behalf of sellers
- An Advert has a large number of attributes (full list here) we’ll cover the key attributes in this article
- Adverts must have at least 1 Variant, as it’s at the variant level that concepts such as Inventory, SKUs and Barcodes reside.
- Indeed when orders are placed, it is the
variantIdthat is used to identify the purchased item.
- Indeed when orders are placed, it is the
- Adverts can be created via a number of different methods, in this article we will focus on how you can create Adverts using the GraphQL
advertUpsertmutation - Adverts can be either:
- “Online” - essentially available for purchase or
- “Offline” - cannot be purchased. This may be because the Seller doesn’t wish to sell that product any longer, or there may be a problem with the way the advert has been created, making it invalid - e.g. it has not been assigned to a category (or Taxon as we call them at Marketplacer).
- The Advert (and the way it can be created) is tightly coupled to the categorization that it’s placed into. We call this categorization hierarchy the “Taxonomy” in Marketplacer, so we’ll be referring to the Taxon that the Advert “belongs to” in this article.
Did you know?
The Advert object does not have a single status representing whether it is online or offline, but rather a series of attributes that when taken in combination will determine whether its online or offline. You can read more about advert state hereAdvert Schema
An advert has multiple attributes (or fields in GraphQL speak). Some of these attributes are simplistic, single-value attributes, for example:
- Title
- Description
- Lowest Price
- And so on…
Some of these attributes are more complex and may be:
- A collection of single values, e.g. a collection of strings
- A collection of key value pairs
- A reference to another full object (e.g. An Advert belongs to one Seller.)
- A collection of objects (e.g. an Advert must have 1 or more Variant objects)
A simplified “schema” of an Advert and it’s primary relationships is shown below, note that:
- We are not showing the single-value fields here
- We are only showing the principal object relationships relevant to advert creation
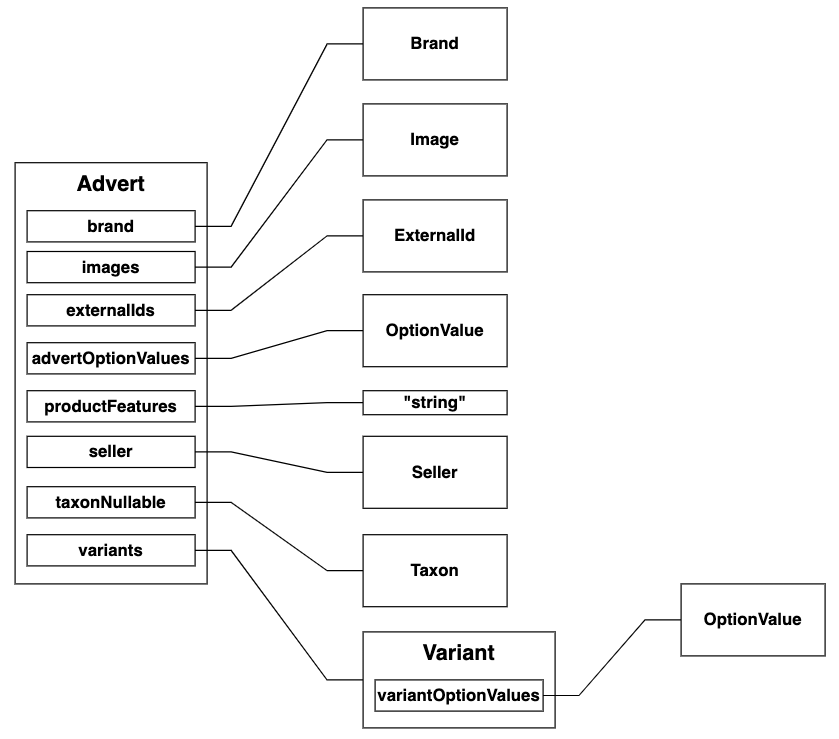
The table below aims to explain what each of these objects are and whether they are mandatory for the Advert to be considered valid and placed online for sale.
| Field Name | Object Type | Description | Mandatory |
|---|---|---|---|
| brand | Brand | The Brand relates to the producer or manufacturer of the product. Brand is a separate object as we maintain a list of Brands in Marketplacer. An Advert must be associated with 1 Brand in order to be considered valid. You can supply the Brand using either (but not both): - A Brand ID - Free-text “mapping values” | Yes (1 only) |
| images | Image | An Advert must have at least 1 image associated with it in order to be considered valid, but can have more. | Yes (1 minimum) |
| externalId | String | This is a singular value representing an external id for the advert. It is typically used to hold the external id reference for the product in external systems. When updating an advert you can opt to use this Id as the key reference for the update (as opposed to the Marketplacer advert object Id). Note: that this Id field can be used by other Marketplacer systems (such as M-Connect) so it should be used with caution. | No |
| externalIds | ExternalId | All adverts have their own Marketplacer generated Id, however you may wish to associate your own Ids (“ExternalIds”) with this Advert too. You can add as many external Ids as you like but they are not mandatory. | No |
| advertOptionValues | OptionValue | The Taxon that you associate an Advert with will determine whether this is mandatory for the Advert to be considered valid or not. An Advert Option Value can be: a single select value, multiple select value or a free text value. | Yes - dependant on Taxon |
| productFeatures | String | Product features are just a collection of free text fields available for all Adverts. They are not dependent on the Taxon type, and they are optional. | No |
| seller | Seller | The Seller “owns” the Advert and is (typically) responsible for creating and updating it. An Advert can have only 1 Seller. Adverts cannot be shared between Sellers. | Yes (1 only) |
| taxonNullable | Taxon | This is the Taxon or “Category” that the Advert has been assigned to. This assignment determines the Option Types that must be applied at both an Advert and Variant level for the Advert to be considered valid. You can supply the Taxon using either (but not both): - A Taxon ID - Free-text “mapping values” | Yes (1 only) |
| variants | Variant | Adverts need to have at least 1 Variant. Variants define possible variations of the Advert. Indeed inventory position, bar codes, SKUs etc all sit at the Variant level, and it is ultimately individual variants that are purchased by the customer. | Yes (1 minimum) |
| variantOptionValues (Variant) | OptionValue | Variant OptionValues define the individual variant(s). Again the Variant Option Values that must be used are linked to the Taxonomy that the Advert belongs to. An Variant Option Value can be: a single select value, multiple select value or free text value. | Yes (1 minimum) |
The Advert is possibly the most complex object to work with in the Marketplacer GraphQL API, especially in reference to the following concepts:
- advertOptionValues (
Advert) - productFeatures (
Advert) - variantOptionValues (
Variant)
With this in mind we are going to walk through some separate examples of creating an advert, starting with simple, through to more complex scenarios.
Taxonomy
Before we continue with some examples of creating an Advert with GraphQL, it’s worth just clarifying the important role of the Taxonomy.
When creating an Advert, you need to assign it to a Taxon, the Taxon represents where the Advert sits in categorization Hierarchy. In the examples we are going to work with, we will work with the following simple Taxonomy structure:
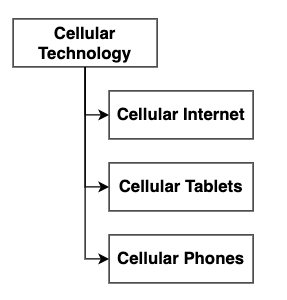
This is a rather unrealistic, 2 level categorization hierarchy (or Taxonomy), but for the purposes of our examples it will suffice. Most usually you will have more than 2 levels in your Taxonomy.
When creating an Advert in the examples that follow we will assign it to either:
- Cellular Internet
- Cellular Tablets
- Cellular Phones
We have configured each of those 3 Taxons to require an increasing number of the taxon-driven concepts mentioned above(advertOptionTypes and variantOptionTypes), so in effect we have assigned a “complexity” to each of the Taxons, as shown below:
| Taxon | appliedTo | fieldType | optionType |
|---|---|---|---|
| Cellular Internet Simple Example | advert variant | single_select single_select | Cellular Material Cellular Memory |
| Cellular Tablets Medium Example | advert advert variant variant | single_select multi_select single_select multi_select | Cellular Material Cellular Network Cellular Memory Cellular Ports |
| Cellular Phones Complex Example | advert advert advert variant variant variant | single_select multi_select free_text (o) single_select multi_select free_text | Cellular Material Cellular Network Cellular Processor Cellular Memory Cellular Ports Cellular Color |
Did you know?
productFeatures are not driven by the Taxon that the Advert is assigned to. They are just a standard attribute available on every Advert, irrespective of Taxon. Think of them in a similar way to the adverts Title or Description. Therefore we have not includedproductFeatures in the above table, and generally speaking we’ll not work much further with them in this article.How do we define the Taxon’s Option Types?
The final part of discussing the Taxonomy is to understand how we configure the Option Types each Taxon requires. For example, from the table above we have said that products in the Cellular Phones category (Taxon), require the following:
optionType | appliedTo | fieldType | optionValues |
|---|---|---|---|
| Cellular Material | advert | SINGLE_SELECT | |
| Cellular Network | advert | MULTI_SELECT | |
| Cellular Processor (0) | advert | FREE_TEXT | N/a |
| Cellular Memory | variant | SINGLE_SELECT | |
| Cellular Ports | variant | MULTI_SELECT | |
| Cellular Color | variant | FREE_TEXT | N/a |
In order to assign those optionTypes to a Taxon, we use something called a Prototype. Therefore each of the 3 Taxons have been assigned a different Prototype that defines the required optionTypes, as shown below:
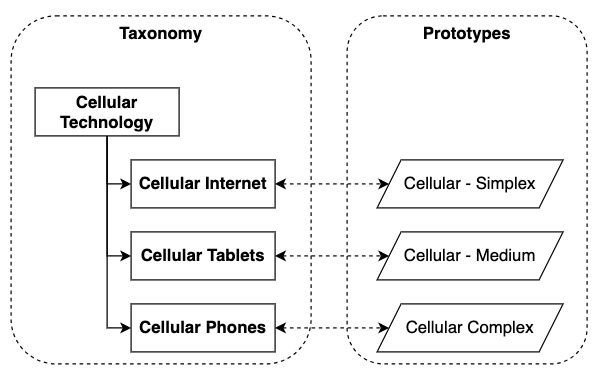
We use Prototypes (as opposed to directly assigning Option Types to the Taxon) so that Prototypes can be re-used on many different Taxons.
Expanding the example further to show how Prototypes are configure is shown below:
Example 1 - Simple
In this example we are going to create an Advert in the Cellular Internet category/taxon, which is assigned the Cellular - Simplex prototype. So in this case we need to supply the following to the advertUpsert mutation:
Advert Values (AdvertInput)
| Value Supplied | Sourced From |
|---|---|
brandIdor brandMappings | - Provide the brandId for the Advert, you can obtain a list of the brandIds from the brands query.- Provide free-text brandMappings to attempt a free text match.Note: is this guide we will be using a brandId. |
Images | You can supply images a URLs or Base64 encoded. In this example we’ll just provide a URL. |
productFeatures | You can supply any collection of free-text strings. productFeatures are optional, but we’ll supply some here to illustrate their purpose. |
sellerId | - If you are creating adverts as an operator, you need to supply a sellerId representing the seller that owns the advert. Seller Ids can be obtained using either the allSellers or sellerSearch queries.- If you are a seller creating an advert you do not explicitly need to supply this value as all API requests are scoped to the API key that you are using. NOTE: This article discusses creating adverts as an Operator, so sellerId is used in all of the examples. |
taxonIdor taxonMappings | - Provide the taxonId for the Advert, you can obtain a list of the taxonIds from the taxon query.- Provide free-text taxonMappings to attempt a free text match.Note: is this guide we will be using a taxonId. |
advertOptionValues | The Cellular - Simplex prototype defines a mandatory Cellular Material optionType (of type SINGLE_SELECT) for the advert. We will need to pass a suitable optionValue here, which we will obtain via the prototypes query to get this information. |
title | title is a mandatory field for an Advert, this is provided a free text |
description | Description is a mandatory field for an Advert, this is provided as free text |
Brand and Taxon Mapping Values
You can provide the Brand (and Taxon) as either:
- A Brand (or Taxon) Id - this is the approach we take in this guide
- As free-text “mapping values”
The 2nd option, (mapping values) allow you to pass free-text values for both Brand and Taxon using the following fields:
brandMappings- this is an array of 1 or more string valuestaxonMappingds- this is an array of 1 or more string values
The Marketplacer platform will then attempt to map these free text values to associated Brands (and Taxons) in Marketplacer. Mapping can be derived by multiple methods, including but not limited to:
- Simple string matching
- E.g. You supply the value
ACMEinbrandMappingsand there is a brand object in Marketplacer with that exact same name
- E.g. You supply the value
- Mappings in Marketplacer
- If you had previously supplied a mapping value that could not be auto-mapped by Marketplacer, you can manually create a mapping between your supplied value and a entity stored in Marketplacer. Then the next time you supply that value, the mapping rule will run. You can read more about mapping here. Note that only Brand and Taxon mapping is supported via the GraphQL API.
NOTE You can use either:
brandIdorbrandMappingsbut not bothtaxonIdortaxonMappingsbut not both
Variant Values (VariantInput)
| Value Supplied | Sourced From |
|---|---|
variantOptionValues | The Cellular - Simplex prototype defines a mandatory Cellular Memory optionType (of type SINGLE_SELECT) for each Variant. We will need to pass a suitable optionValue here, which we will obtain via the prototypes query to get this information. |
countOnHand | The stock holding (often referred to a inventory) is held at the variant level, this is a mandatory field, unless infiniteQuantity is set to true |
Note we are using the minimum set of values to allow us to create an Advert. For more detail on the entire range of attributes that you can supply, please refer to the Reference Documentation.
Brand Query
As stated above the brandId is a mandatory attribute required to create an advert. A simple example of this query, along with a sample response is provided below:
Query
query GetBrands {
  brands(first: 100, after: null) {
    totalCount
    pageInfo {
      hasNextPage
      endCursor
    }
    nodes {
      id
      name
    }
  }
}
Response
{
  "data": {
    "brands": {
      "totalCount": 3091,
      "pageInfo": {
        "hasNextPage": true,
        "endCursor": "MTA"
      },
      "nodes": [
        {
          "id": "QnJhbmQtNA==",
          "name": "Advocate 1"
        },
        {
          "id": "QnJhbmQtMjQz",
          "name": "Avid"
        },
        {
          "id": "QnJhbmQtMjQ1",
          "name": "Bucket Placer"
        },
        {
          "id": "QnJhbmQtMjQ2",
          "name": "Elite"
        }
        .
        .
        .
      ]
    }
  }
}
Select the id of the brand that you want to use and put it aside for now.
Taxon Query
We can use the taxon query to get:
- The
taxonIdrequired - The
prototypeIdso that we can determine which elements are required of this Taxon by using theprototypequery
An example query and response are given below:
TAXON DEPTH
We are using a simple taxonomy in this example with a depth of 2, which the example query reflects. If you have a deeper depth taxonomy, you will need to include additionalchildren clauses in your query to ensure you pull all levels of the taxonomy.Query
query GetTaxons {
  taxons (first: 3, after: null) {
    totalCount
    pageInfo {
      ...PageInfoPartial
    }
    nodes {
      id
      displayName
      treeName
      prototype {
        name
        id
      }
      children (first: 3, after: null) {
        totalCount
        pageInfo {
          ...PageInfoPartial
        }
        edges {
          node {
            id
            displayName
            treeName
            prototype {
              name
              id
            } #<- INSERT MORE CHILDREN CLAUSES HERE IF NEEDED
          }
        }
      }
    }
  }
}

fragment PageInfoPartial on PageInfo {
	hasNextPage
	endCursor
}
Response (we have abbreviated the response to show only relevant detail )
{
  "edges": [
    {
      "node": {
        "id": "VGF4b24tMjc4",
        "displayName": "Cellular Internet",
        "treeName": "Cellular Technology - Cellular Internet",
        "prototype": {
          "name": "Cellular - Simplex",
          "id": "UHJvdG90eXBlLTEzMw=="
        },
        "children": {
          "edges": []
        }
      }
    },
    {
      "node": {
        "id": "VGF4b24tMjgw",
        "displayName": "Cellular Phones",
        "treeName": "Cellular Technology - Cellular Phones",
        "prototype": {
          "name": "Cellular - Complex",
          "id": "UHJvdG90eXBlLTEzNQ=="
        },
        "children": {
          "edges": []
        }
      }
    },
    {
      "node": {
        "id": "VGF4b24tMjc5",
        "displayName": "Cellular Tablets",
        "treeName": "Cellular Technology - Cellular Tablets",
        "prototype": {
          "name": "Cellular - Medium",
          "id": "UHJvdG90eXBlLTEzNA=="
        },
        "children": {
          "edges": []
        }
      }
    }
  ]
}
You can see from the example payload that we get both Taxon and Prototype ids that we can use in the subsequent queries. So we’ll use the following values:
- Taxon Id for Cellular Internet:
VGF4b24tMjc4 - Prototype Id for Cellular - Simplex:
UHJvdG90eXBlLTEzMw==
We’ll use the Prototype Id in the next query.
Prototype Query
Query
query GetOptionValuesAndTypesForPrototype {
  nodes(ids: "UHJvdG90eXBlLTEzMw==") {
    ... on Prototype {
      id
      name
      optionTypes(first:10 after:  null) {
        totalCount
        pageInfo
        {
          hasNextPage
          endCursor
        }
        nodes {
          id
          name
          fieldType
          appliedTo
          optional
          optionValues {
            nodes {
              id
              name
              displayName
            }
          }
        }
      }
    }
  }
}
Response
{
  "data": {
    "nodes": [
      {
        "id": "UHJvdG90eXBlLTEzMw==",
        "name": "Cellular - Simplex",
        "optionTypes": {
          "totalCount": 2,
          "pageInfo": {
            "hasNextPage": false,
            "endCursor": "MQ"
          },
          "nodes": [
            {
              "id": "T3B0aW9uVHlwZS0yNDY=",
              "name": "Cellular Material",
              "fieldType": "SINGLE_SELECT",
              "appliedTo": "ADVERT",
              "optional": false,
              "optionValues": {
                "nodes": [
                  {
                    "id": "T3B0aW9uVmFsdWUtNzM0",
                    "name": "Plastic",
                    "displayName": "Plastic"
                  },
                  {
                    "id": "T3B0aW9uVmFsdWUtNzM1",
                    "name": "Aluminium",
                    "displayName": "Aluminium"
                  },
                  {
                    "id": "T3B0aW9uVmFsdWUtNzM2",
                    "name": "Carbon Fiber",
                    "displayName": "Carbon Fiber"
                  }
                ]
              }
            },
            {
              "id": "T3B0aW9uVHlwZS0yNDc=",
              "name": "Cellular Memory",
              "fieldType": "SINGLE_SELECT",
              "appliedTo": "VARIANT",
              "optional": false,
              "optionValues": {
                "nodes": [
                  {
                    "id": "T3B0aW9uVmFsdWUtNzMw",
                    "name": "64Gb",
                    "displayName": "64Gb"
                  },
                  {
                    "id": "T3B0aW9uVmFsdWUtNzMx",
                    "name": "128Gb",
                    "displayName": "128Gb"
                  },
                  {
                    "id": "T3B0aW9uVmFsdWUtNzMy",
                    "name": "256Gb",
                    "displayName": "256Gb"
                  },
                  {
                    "id": "T3B0aW9uVmFsdWUtNzMz",
                    "name": "512Gb",
                    "displayName": "512Gb"
                  }
                ]
              }
            }
          ]
        }
      }
    ]
  }
}
You can see that we have 2 optionTypes with the following attributes:
optionType | fieldType | appliedTo | optionValues | Optional |
|---|---|---|---|---|
| Cellular Material | SINGLE_SELECT | ADVERT | false | |
| Cellular Memory | SINGLE_SELECT | VARIANT | false |
We need to supply an Id for each optionType, so in this case we’ll select:
- Cellular Material
T3B0aW9uVmFsdWUtNzM2(Carbon Fiber)
- Cellular Memory
T3B0aW9uVmFsdWUtNzMy(256Gb)
advertUpsert - Simple
We can now plug in the values we’ve retrieved using the previous queries into the advertUpsert mutation as follows:
Mutation
mutation CreateProductSimple {
  advertUpsert(
    input: {
      attributes: {
        sellerId: "U2VsbGVyLTE1"  # Only required by the operator
        brandId: "QnJhbmQtNA=="
        taxonId: "VGF4b24tMjc4"
        title: "SolocalMe 4G Wireless Hot Spot"
        description: "WiFi Hotspot powered by 4G"
        price: "49.99"
        attemptAutoPublish: true
        images: [
          {
            sourceUrl: "https://<LINK TO IMAGE>.jpg"
          }
        ]
        productFeatures:
          ["Fast charge", "Light weight", "4G compatible"]
        advertOptionValues: [
          { optionValueId: "T3B0aW9uVmFsdWUtNzM2" }
        ]
        variants: [
          {
            countOnHand: 1000
            variantOptionValues: [
              { optionValueId: "T3B0aW9uVmFsdWUtNzMy" }
            ]
          }
        ]
      }
    }
  ) {
    status
    advert {
      id
      legacyId
    }
    errors {
      field
      messages
    }
  }
}
Points to note:
- We have included some
productFeatures, which as you can see are just a collection of strings. We will omitproductFeaturesfrom the rest of our examples.
Example 2 - Medium
In this example we are going to create an Advert in the Cellular Tablets Taxon, which is assigned the prototype Cellular - Medium. We need to supply the same fields as we did for the previous example, (omitted for brevity), however when we come onto looking at the required optionTypes for this prototype, we’ll see that we need to supply some new values.
Brand Query
For brevity we won’t show the brand query in full again, please refer to the simple example above for a refresher.
Taxon Query
For brevity we won’t show the full taxon query again, however as we want to create an advert in the Cellular Tablets taxon we’ll use the following values:
- Taxon Id for Cellular Tables:
VGF4b24tMjc5 - Prototype Id for Cellular - Medium:
UHJvdG90eXBlLTEzNA==
Prototype Query
We do want to re-run the prototype query again as we’ll want to ensure we know what’s required when creating an Advert for this Prototype / Taxon.
Query
query GetOptionValuesAndTypesForPrototype {
  nodes(ids: "UHJvdG90eXBlLTEzNA==") {
    ... on Prototype {
      id
      name
      optionTypes(first:10 after:  null) {
        totalCount
        pageInfo
        {
          hasNextPage
          endCursor
        }
        nodes {
          id
          name
          fieldType
          appliedTo
          optional
          optionValues {
            nodes {
              id
              name
              displayName
            }
          }
        }
      }
    }
  }
}
Querying for this prototype we get the following result:
Response
{
  "data": {
    "nodes": [
      {
        "id": "UHJvdG90eXBlLTEzNA==",
        "name": "Cellular - Medium",
        "optionTypes": {
          "totalCount": 4,
          "pageInfo": {
            "hasNextPage": false,
            "endCursor": "MQ"
          },
          "nodes": [
            {
              "id": "T3B0aW9uVHlwZS0yMjQ=",
              "name": "Cellular Phone Memory",
              "fieldType": "SINGLE_SELECT",
              "appliedTo": "VARIANT",
              "optional": false,
              "optionValues": {
                "nodes": [
                  {
                    "id": "T3B0aW9uVmFsdWUtNjc5",
                    "name": "64Gb",
                    "displayName": "64Gb"
                  },
                  {
                    "id": "T3B0aW9uVmFsdWUtNjgw",
                    "name": "128Gb",
                    "displayName": "128Gb"
                  },
                  {
                    "id": "T3B0aW9uVmFsdWUtNjgx",
                    "name": "256Gb",
                    "displayName": "256Gb"
                  }
                ]
              }
            },
            {
              "id": "T3B0aW9uVHlwZS0yNDY=",
              "name": "Cellular Material",
              "fieldType": "SINGLE_SELECT",
              "appliedTo": "ADVERT",
              "optional": false,
              "optionValues": {
                "nodes": [
                  {
                    "id": "T3B0aW9uVmFsdWUtNzM0",
                    "name": "Plastic",
                    "displayName": "Plastic"
                  },
                  {
                    "id": "T3B0aW9uVmFsdWUtNzM1",
                    "name": "Aluminium",
                    "displayName": "Aluminium"
                  },
                  {
                    "id": "T3B0aW9uVmFsdWUtNzM2",
                    "name": "Carbon Fiber",
                    "displayName": "Carbon Fiber"
                  }
                ]
              }
            },
            {
              "id": "T3B0aW9uVHlwZS0yNDg=",
              "name": "Cellular Network",
              "fieldType": "MULTI_SELECT",
              "appliedTo": "ADVERT",
              "optional": false,
              "optionValues": {
                "nodes": [
                  {
                    "id": "T3B0aW9uVmFsdWUtNzI2",
                    "name": "2G",
                    "displayName": "2G"
                  },
                  {
                    "id": "T3B0aW9uVmFsdWUtNzI3",
                    "name": "3G",
                    "displayName": "3G"
                  },
                  {
                    "id": "T3B0aW9uVmFsdWUtNzI4",
                    "name": "4G",
                    "displayName": "4G"
                  },
                  {
                    "id": "T3B0aW9uVmFsdWUtNzI5",
                    "name": "5G",
                    "displayName": "5G"
                  }
                ]
              }
            },
            {
              "id": "T3B0aW9uVHlwZS0yNDk=",
              "name": "Cellular Ports",
              "fieldType": "MULTI_SELECT",
              "appliedTo": "VARIANT",
              "optional": false,
              "optionValues": {
                "nodes": [
                  {
                    "id": "T3B0aW9uVmFsdWUtNzIz",
                    "name": "USB-C",
                    "displayName": "USB-C"
                  },
                  {
                    "id": "T3B0aW9uVmFsdWUtNzI0",
                    "name": "3.5 mm Headphone",
                    "displayName": "3.5 mm Headphone"
                  },
                  {
                    "id": "T3B0aW9uVmFsdWUtNzI1",
                    "name": "USB-B",
                    "displayName": "USB-B"
                  }
                ]
              }
            }
          ]
        }
      }
    ]
  }
}
You can see that we are required to supply optionValue Ids for the 2 SINGLE_SELECT optionTypes we had previously, but that we are now also required to supply values for 2 “new” MULTI_SELECT optionTypes. A breakdown of this is shown below:
optionType | fieldType | appliedTo | optionValues | Optional |
|---|---|---|---|---|
| Cellular Material | SINGLE_SELECT | ADVERT | false | |
| Cellular Memory | SINGLE_SELECT | VARIANT | false | |
| Cellular Network | MULTI_SELECT | ADVERT | false | |
| Cellular Ports | MULTI_SELECT | VARIANT | false |
We need to supply Id(s) for each optionType, so in this case we’ll select:
- Cellular Material
T3B0aW9uVmFsdWUtNzM0(Plastic)
- Cellular Memory
T3B0aW9uVmFsdWUtNzMx(128Gb)
- Cellular Networks
T3B0aW9uVmFsdWUtNzI4(4G)T3B0aW9uVmFsdWUtNzI5(5G)
- Cellular Ports
T3B0aW9uVmFsdWUtNzIz(USB-C)T3B0aW9uVmFsdWUtNzI0(3.5mm)
advertUpsert - Medium
We now have enough information to run the advertUpsert query again:
Mutation
mutation CreateProductMedium {
  advertUpsert(
    input: {
      attributes: {
        sellerId: "U2VsbGVyLTE1"  # Only required by the operator
        brandId: "QnJhbmQtNA=="
        taxonId: "VGF4b24tMjc5"
        title: "Venovo 5G Tablet"
        description: "Powerful Android Tablet"
        price: "349.99"
        attemptAutoPublish: true
        images: [
          {
            sourceUrl: "https://<LINK TO IMAGE>.jpg"
          }
        ]
        advertOptionValues: [
          { optionValueId: "T3B0aW9uVmFsdWUtNzM0" }
          { optionValueId: "T3B0aW9uVmFsdWUtNzI4" }
          { optionValueId: "T3B0aW9uVmFsdWUtNzI5" }
        ]
        variants: [
          {
            countOnHand: 1000
            variantOptionValues: [
              { optionValueId: "T3B0aW9uVmFsdWUtNzMx" }
              { optionValueId: "T3B0aW9uVmFsdWUtNzIz" }
              { optionValueId: "T3B0aW9uVmFsdWUtNzI0" }
            ]
          }
        ]
      }
    }
  ) {
    status
    advert {
      id
      legacyId
    }
    errors {
      field
      messages
    }
  }
}
Example 3 - Complex
In this example we are going to create an Advert in the Cellular Phones Taxon, which is assigned the prototype Cellular - Complex. We need to supply the same fields as we did for the previous example, (omitted for brevity), however when we come onto looking at the required optionTypes for this prototype, we’ll see that we need to supply some new values.
Brand Query
For brevity we won’t show the brand query in full again, please refer to the simple example above for a refresher.
Taxon Query
For brevity we won’t show the full taxon query again, however as we want to create an advert in the Cellular Phones taxon we’ll use the following values:
- Taxon Id for Cellular Phones:
VGF4b24tMjgw - Prototype Id for Cellular - Complex:
UHJvdG90eXBlLTEzNQ==
Prototype Query
We do want to re-run the prototype query again as we’ll want to ensure we know what’s required when creating an Advert for this Prototype / Taxon.
Query
query GetOptionValuesAndTypesForPrototype {
  nodes(ids: "UHJvdG90eXBlLTEzNQ==") {
    ... on Prototype {
      id
      name
      optionTypes(first:10 after:  null) {
        totalCount
        pageInfo
        {
          hasNextPage
          endCursor
        }
        nodes {
          id
          name
          fieldType
          appliedTo
          optional
          optionValues {
            nodes {
              id
              name
              displayName
            }
          }
        }
      }
    }
  }
}
Response
{
  "data": {
    "nodes": [
      {
        "id": "UHJvdG90eXBlLTEzNQ==",
        "name": "Cellular - Complex",
        "optionTypes": {
          "totalCount": 6,
          "pageInfo": {
            "hasNextPage": false,
            "endCursor": "MQ"
          },
          "nodes": [
            {
              "id": "T3B0aW9uVHlwZS0yNDY=",
              "name": "Cellular Material",
              "fieldType": "SINGLE_SELECT",
              "appliedTo": "ADVERT",
              "optional": false,
              "optionValues": {
                "nodes": [
                  {
                    "id": "T3B0aW9uVmFsdWUtNzM0",
                    "name": "Plastic",
                    "displayName": "Plastic"
                  },
                  {
                    "id": "T3B0aW9uVmFsdWUtNzM1",
                    "name": "Aluminium",
                    "displayName": "Aluminium"
                  },
                  {
                    "id": "T3B0aW9uVmFsdWUtNzM2",
                    "name": "Carbon Fiber",
                    "displayName": "Carbon Fiber"
                  }
                ]
              }
            },
            {
              "id": "T3B0aW9uVHlwZS0yNDc=",
              "name": "Cellular Memory",
              "fieldType": "SINGLE_SELECT",
              "appliedTo": "VARIANT",
              "optional": false,
              "optionValues": {
                "nodes": [
                  {
                    "id": "T3B0aW9uVmFsdWUtNzMw",
                    "name": "64Gb",
                    "displayName": "64Gb"
                  },
                  {
                    "id": "T3B0aW9uVmFsdWUtNzMx",
                    "name": "128Gb",
                    "displayName": "128Gb"
                  },
                  {
                    "id": "T3B0aW9uVmFsdWUtNzMy",
                    "name": "256Gb",
                    "displayName": "256Gb"
                  },
                  {
                    "id": "T3B0aW9uVmFsdWUtNzMz",
                    "name": "512Gb",
                    "displayName": "512Gb"
                  }
                ]
              }
            },
            {
              "id": "T3B0aW9uVHlwZS0yNDg=",
              "name": "Cellular Network",
              "fieldType": "MULTI_SELECT",
              "appliedTo": "ADVERT",
              "optional": false,
              "optionValues": {
                "nodes": [
                  {
                    "id": "T3B0aW9uVmFsdWUtNzI2",
                    "name": "2G",
                    "displayName": "2G"
                  },
                  {
                    "id": "T3B0aW9uVmFsdWUtNzI3",
                    "name": "3G",
                    "displayName": "3G"
                  },
                  {
                    "id": "T3B0aW9uVmFsdWUtNzI4",
                    "name": "4G",
                    "displayName": "4G"
                  },
                  {
                    "id": "T3B0aW9uVmFsdWUtNzI5",
                    "name": "5G",
                    "displayName": "5G"
                  }
                ]
              }
            },
            {
              "id": "T3B0aW9uVHlwZS0yNDk=",
              "name": "Cellular Ports",
              "fieldType": "MULTI_SELECT",
              "appliedTo": "VARIANT",
              "optional": false,
              "optionValues": {
                "nodes": [
                  {
                    "id": "T3B0aW9uVmFsdWUtNzIz",
                    "name": "USB-C",
                    "displayName": "USB-C"
                  },
                  {
                    "id": "T3B0aW9uVmFsdWUtNzI0",
                    "name": "3.5 mm Headphone",
                    "displayName": "3.5 mm Headphone"
                  },
                  {
                    "id": "T3B0aW9uVmFsdWUtNzI1",
                    "name": "USB-B",
                    "displayName": "USB-B"
                  }
                ]
              }
            },
            {
              "id": "T3B0aW9uVHlwZS0yNTA=",
              "name": "Cellular Processor",
              "fieldType": "FREE_TEXT",
              "appliedTo": "ADVERT",
              "optional": true,
              "optionValues": {
                "nodes": []
              }
            },
            {
              "id": "T3B0aW9uVHlwZS0yNTI=",
              "name": "Cellular Color",
              "fieldType": "FREE_TEXT",
              "appliedTo": "VARIANT",
              "optional": false,
              "optionValues": {
                "nodes": []
              }
            }
          ]
        }
      }
    ]
  }
}
You can see that we are required to supply optionValue Ids for the optionTypes (2x SINGLE_SELECT & 2x MULTI_SELECT) we have previously worked with, but that we now have 2x FREE_TEXT optionTypes - 1 of which is Optional. A breakdown of this is shown below:
optionType | fieldType | appliedTo | optionValues | Optional |
|---|---|---|---|---|
| Cellular Material | SINGLE_SELECT | ADVERT | false | |
| Cellular Memory | SINGLE_SELECT | VARIANT | false | |
| Cellular Network | MULTI_SELECT | ADVERT | false | |
| Cellular Ports | MULTI_SELECT | VARIANT | false | |
| Cellular Processor | FREE_TEXT | ADVERT | N/a | true |
| Cellular Color | FREE_TEXT | VARIANT | N/a | false |
We need to supply Id(s) for each optionType, so in this case we’ll select:
- Cellular Material
T3B0aW9uVmFsdWUtNzM0(Plastic)
- Cellular Memory
T3B0aW9uVmFsdWUtNzMx(128Gb)
- Cellular Networks
T3B0aW9uVmFsdWUtNzI4(4G)T3B0aW9uVmFsdWUtNzI5(5G)
- Cellular Ports
T3B0aW9uVmFsdWUtNzIz(USB-C)T3B0aW9uVmFsdWUtNzI0(3.5mm)
For FREE_TEXT optionTypes we cannot supply an optionValueId, because we don’t have any! In this case we supply the optionTypeId along with the text value, so in this case we’ll supply values for both:
- Cellular Processor
T3B0aW9uVHlwZS0yNTA=(Cellular Processor)Snapdragon 8+(“text value”)
- Cellular Color
T3B0aW9uVHlwZS0yNTI=(Cellular Color)Screaming Orange(“text value”)
advertUpsert - Complex
An example of of the advertUpsert mutation is shown below:
Mutation
mutation CreateProductComplex {
  advertUpsert(
    input: {
      attributes: {
        sellerId: "U2VsbGVyLTE1"  # Only required by the operator
        brandId: "QnJhbmQtNA=="
        taxonId: "VGF4b24tMjgw"
        title: "Namsung Mobile Phone"
        description: "Powerful Phone"
        price: "549.99"
        attemptAutoPublish: true
        images: [
          {
            sourceUrl: "https://<LINK TO IMAGE>.jpg"
          }
        ]
        advertOptionValues: [
          { optionValueId: "T3B0aW9uVmFsdWUtNzM0" }
          { optionValueId: "T3B0aW9uVmFsdWUtNzI4" }
          { optionValueId: "T3B0aW9uVmFsdWUtNzI5" }
          { optionTypeId: "T3B0aW9uVHlwZS0yNTA=", textValue: "Snapdragon 8+"}
        ]
        variants: [
          {
            countOnHand: 1000
            variantOptionValues: [
              { optionValueId: "T3B0aW9uVmFsdWUtNzMx" }
              { optionValueId: "T3B0aW9uVmFsdWUtNzIz" }
              { optionValueId: "T3B0aW9uVmFsdWUtNzI0" }
              { optionTypeId: "T3B0aW9uVHlwZS0yNTI=", textValue: "Screaming Orange"}
            ]
          }
        ]
      }
    }
  ) {
    status
    advert {
      id
      legacyId
    }
    errors {
      field
      messages
    }
  }
}
Optional Option Types
In our last example, the Cellular Processor option type was optional so we could re-run our mutation without that and we would still have a valid Advert.However, if we choose to omit one of the non-optional option types, then while the product would be created, it would be created in an “invalid” state.
Updating Adverts and Variants
ExternalId Vs ExternalIds
In this section we talk about how the externalId (singular), can be used to look up the advert or variant when attempting an update. This should not be confused with the collection of externalIds (plural) that can also be attached to an advert or variant.
externalIds cannot be used to reference either the advert or variant objects to perform updates.
This is discussed in more detail here.
As the name would suggest, the advertUpsert mutation can be used to update existing adverts, and for the most part usage follows the same pattern as creation. Some points to be aware of when you want to update either the advert or associated variants are listed below:
- The advert
idor theexternalIdcan be used to reference the advert when updating it- If you supply only an
externalIdfor the advert, and thatexternalIddoes not exist, then a new advert will be created - If you supply both an
idand andexternalIdfor the advert, theidwill take precedence for the look up, and if theexternalIdis different, then that will be updated to theexternalIdsupplied.
- If you supply only an
- When updating variants using
advertUpsertyou must:- Supply either an advert
idorexternalId(to reference the advert to which the variant belongs) - Supply either a variant
idorexternalIdfor the variant(s) you want to update - If you do not supply either a variant
idorexternalIdalong with the variant definition, then a new variant will be created - If you supply only an
externalIdfor the variant, and thatexternalIddoes not exist, then a new variant will be created - If you supply both an
idand andexternalIdfor the variant, theidwill take precedence for the look up, and if theexternalIdis different, then that will be updated to theexternalIdsupplied.
- Supply either an advert