Create a taxonomy
7 minute read
What you’ll learn
- Key terms used in reference to a Marketplacer Taxonomy
- The high-level schema of the primary taxonomy entities
- The queries and mutations that you can use to create a taxonomy
Key Terms
| Term | Description |
|---|---|
| Advert | Represents a product sold by a Seller on the marketplace. Adverts can have advertOptionValues that represent both mandatory and optional attributes that a product can have. These option values are derived via the Prototype attached to the Taxon (aka Category) that a product has been placed into. |
| Variant | An Advert (aka Product) in Marketplacer has 1 or more Variants. Variants are the way a product can “vary” e.g. by size and color. It is that variant that is ultimately purchased by the customer, and it is at the variant level that fields such as stock position, barcode and Sku are held. Variants can have variantOptionTypes that represent both mandatory and optional attributes that a variant can have. These option values are derived via the Prototype attached to the Taxon (aka Category) that the variants product has been placed into. |
| Taxon | Represent a category “node” that forms part of an overall categorization hierarchy. E.g. “Electronics”, “Computers” and “Laptops” are all Taxons in the following hierarchy: -> Electronics - -> Computers - - -> Laptops |
| Option Types & Values | Option Types are groupings of Option Values, e.g. The Color Option Type, could have Option Values of: Blue, Green, Red etc. Option Types can have 1 of 3 fieldType configurations:- SINGLE_SELECT- MULTI_SELECT- FREE_TEXTEach of which can be mandatory or optional, and can be applied at both the Advert ( advertOptionValues) or Variant (variantOptionValues) level. |
| Prototype | The Option Types applicable Adverts and Variants are derived from the Taxon the Advert has been placed into, however Option Types are not configured directly against the Taxon but via a Prototype. So: - Option Types are assigned to a Prototype - Prototypes are assigned to the Taxon |
Example
To further illustrate the concepts described earlier, observe the following Option Type and Value configuration:
optionType | appliedTo | fieldType | optionValues |
|---|---|---|---|
| Cellular Material | advert | SINGLE_SELECT | |
| Cellular Network | advert | MULTI_SELECT | |
| Cellular Processor (0) | advert | FREE_TEXT | N/a |
| Cellular Memory | variant | SINGLE_SELECT | |
| Cellular Ports | variant | MULTI_SELECT | |
| Cellular Color | variant | FREE_TEXT | N/a |
Here we have:
- 6 Option Types
- 3 at the Advert level
- 3 at the Variant level
- The
Cellular ProcessorOption Type (which isFREE_TEXT) has been defined as optional (O)
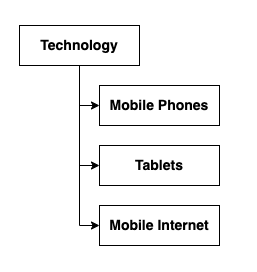
If we then have the following (exceedingly simple) Taxonomy structure:
We can assign the Option Types to each Taxon using a prototype, this is illustrated below:
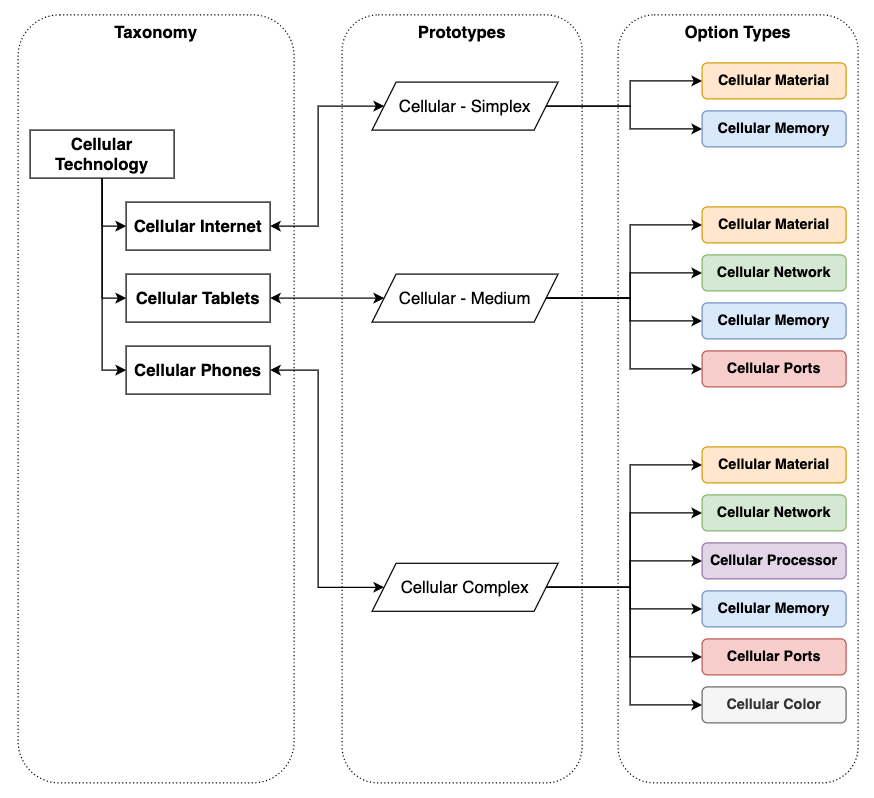
Therefore when we create a Product in the Cellular Phones taxon, the following Option Values can be configured for that product:
| Option Type | Applied To | Field Type | Mandatory |
|---|---|---|---|
| Cellular Material | advert | SINGLE_SELECT | Yes - 1 Value |
| Cellular Network | advert | MULTI_SELECT | Yes - 1 or more values |
| Cellular Processor | advert | FREE_TEXT | No |
| Cellular Memory | variant | SINGLE_SELECT | Yes - 1 Value |
| Cellular Ports | variant | MULTI_SELECT | Yes - 1 or more values |
| Cellular Color | variant | FREE_TEXT | Yes - some text value |
Schema
The following is a simplified view of the key entity relationships for the object types we’ve discussed:
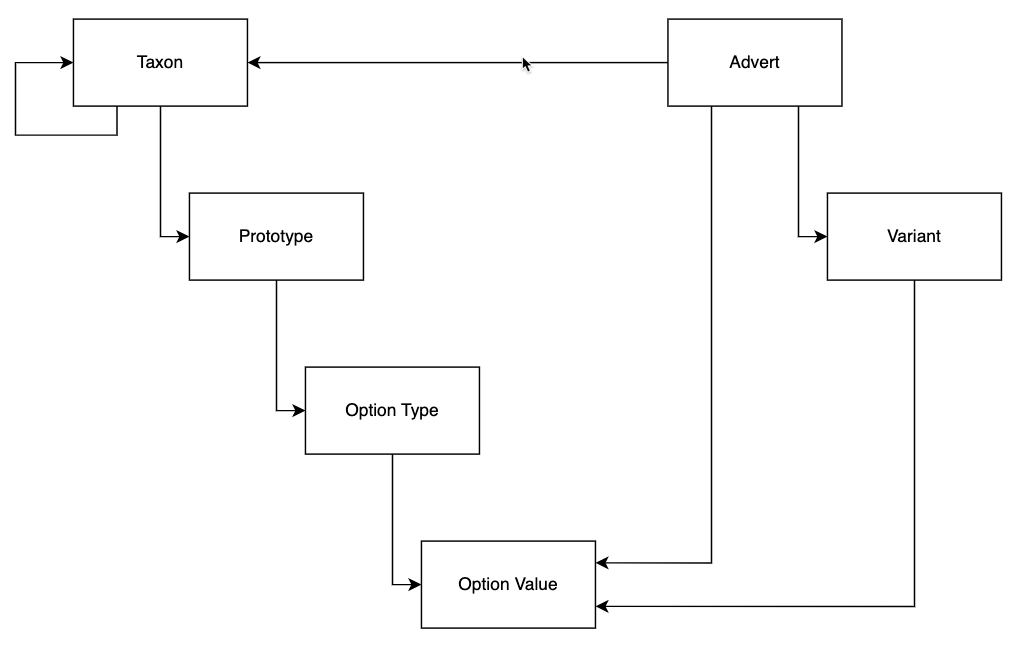
For a more detailed view you can interactively explore the GraphQL schema using GraphQL Voyager.
Creating a Taxonomy
The following steps illustrate the queries and mutations that you can use in the Operator API to create a taxonomy, points to note:
We will create a simple taxonomy using all the concepts mentioned above, however detailed taxonomy design is outside the scope of this guide.
These steps can be performed in the Operator Portal via the UI, we will be focused only on the API approach in this article.
- You can read more about this approach in the Knowledge Base
API Collections
While we provide example GraphQL snippets in this article, you can also find the examples in the Marketplacer Operator API collections for Postman and Insomnia.
Taxonomy to Build
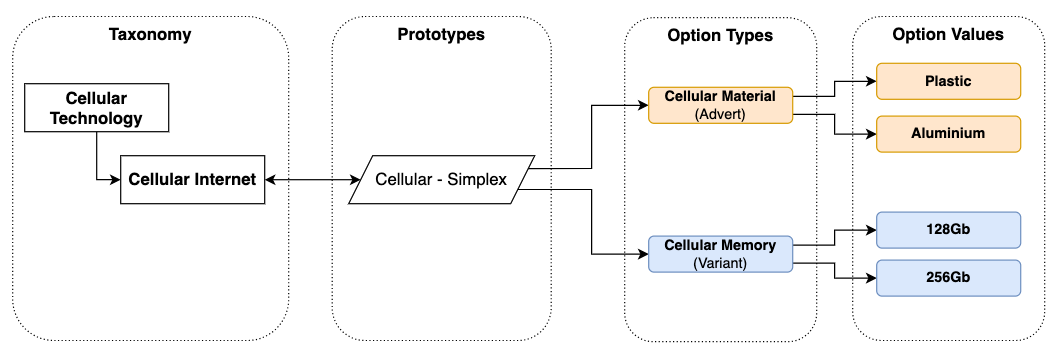
The Taxonomy we are going to build is a simplified version of the previous example:
1 . Create the Prototype
We’ll use the prototypeCreateOrUpdate mutation to create our Cellular Simplex prototype as follows:
mutation PrototypeCreateOrUpdate(
 $input: PrototypeCreateOrUpdateMutationInput!
) {
 prototypeCreateOrUpdate(input: $input) {
  errors {
   field
   messages
  }
  prototype {
   id
   name
  }
 }
}
Passing in the following variables:
{
  "input": {
    "name": "Cellular Simplex"
  }
}
Executing this mutation will return the following payload:
{
  "data": {
    "prototypeCreateOrUpdate": {
      "errors": null,
      "prototype": {
        "id": "UHJvdG90eXBlLTQ=",
        "name": "Cellular Simplex"
      }
    }
  }
}
Put aside the id value as we’ll need this in the steps that follow.
2. Create 2x Option Types
We want to create 2x Option Types:
- Cellular Material (applied to
Advert) - Cellular Memory (applied to
Variant)
To do this we’ll use the optionTypeCreateOrUpdate mutation as follows:
mutation OptionTypeCreateOrUpdate(
 $input: OptionTypeCreateOrUpdateMutationInput!
) {
 optionTypeCreateOrUpdate(input: $input) {
  errors {
   field
   messages
  }
  optionType {
   id
   name
  }
 }
}
And we’ll execute it 2x with the following variable payloads:
Note we are supplying the prototype
idfor the prototype we created in step 1.
Variable Set for Cellular Material
{
  "input": {
    "prototypeIds": [
      "UHJvdG90eXBlLTQ="
    ],
    "name": "Cellular Material",
    "displayName": "Cellular Material",
    "appliedTo": "ADVERT",
    "fieldType": "SINGLE_SELECT",
    "optional": false
  }
}
Returns response
{
  "data": {
    "optionTypeCreateOrUpdate": {
      "errors": null,
      "optionType": {
        "id": "T3B0aW9uVHlwZS02",
        "name": "Cellular Material"
      }
    }
  }
}
Variable Set for Cellular Memory
{
  "input": {
    "prototypeIds": [
      "UHJvdG90eXBlLTQ="
    ],
    "name": "Cellular Memory",
    "displayName": "Cellular Memory",
    "appliedTo": "VARIANT",
    "fieldType": "SINGLE_SELECT",
    "optional": false
  }
}
Returns response
{
  "data": {
    "optionTypeCreateOrUpdate": {
      "errors": null,
      "optionType": {
        "id": "T3B0aW9uVHlwZS03",
        "name": "Cellular Memory"
      }
    }
  }
}
Put aside the 2x id values for the Option Types we just created as we’ll need these in the next step.
3. Create 4x Option Values
We want to create 4 Option Values for the 2 Option Types we just created:
- Plastic (Cellular Material)
- Aluminium (Cellular Material)
- 128Gb (Cellular Memory)
- 256Gb (Cellular Memory)
To do this we’ll use the optionValueCreateOrUpdate mutation as follows:
mutation OptionValueCreateOrUpdate(
 $input: OptionValueCreateOrUpdateMutationInput!
) {
 optionValueCreateOrUpdate(input: $input) {
  errors {
   field
   messages
  }
  optionValue {
   id
   name
  }
 }
}
And we’ll execute it 4x with the following variable payloads:
Note we are supplying the relevant option type
ids for the option types we created in step 2.
Variable Set for Plastic
{
  "input": {
    "optionTypeId": "T3B0aW9uVHlwZS02",
    "displayName": "Plastic",
    "name": "Plastic"
  }
}
Returns response
{
  "data": {
    "optionValueCreateOrUpdate": {
      "errors": null,
      "optionValue": {
        "id": "T3B0aW9uVmFsdWUtNDg=",
        "name": "Plastic"
      }
    }
  }
}
Variable Set for Aluminium
{
  "input": {
    "optionTypeId": "T3B0aW9uVHlwZS02",
    "displayName": "Aluminium",
    "name": "Aluminium"
  }
}
Returns response
{
  "data": {
    "optionValueCreateOrUpdate": {
      "errors": null,
      "optionValue": {
        "id": "T3B0aW9uVmFsdWUtNDk=",
        "name": "Aluminium"
      }
    }
  }
}
Variable Set for 128Gb
{
  "input": {
    "optionTypeId": "T3B0aW9uVHlwZS03",
    "displayName": "128Gb",
    "name": "128Gb"
  }
}
Returns response
{
  "data": {
    "optionValueCreateOrUpdate": {
      "errors": null,
      "optionValue": {
        "id": "T3B0aW9uVmFsdWUtNTA=",
        "name": "128Gb"
      }
    }
  }
}
Variable Set for 256Gb
{
  "input": {
    "optionTypeId": "T3B0aW9uVHlwZS03",
    "displayName": "256Gb",
    "name": "256Gb"
  }
}
Returns response
{
  "data": {
    "optionValueCreateOrUpdate": {
      "errors": null,
      "optionValue": {
        "id": "T3B0aW9uVmFsdWUtNTE=",
        "name": "256Gb"
      }
    }
  }
}
4. Create our Taxons
In this last step we’ll create our 2 Taxons:
- Cellular Technology
- Cellular Internet
To do so well use the taxonCreateOrUpdate mutations as follows:
mutation TaxonCreateOrUpdate($input: TaxonCreateOrUpdateMutationInput!) {
 taxonCreateOrUpdate(input: $input) {
  status
  errors {
   field
   messages
  }
  taxon {
   id
  }
 }
}
And we’ll execute it 2x with the following variable payloads:
Variable Set for Cellular Technology
Note: we are not supplying a prototype Id for this Taxon
{
  "input": {
    "displayName": "Cellular Technology",
    "title": "Cellular Technology"
  }
}
Returns response:
{
  "data": {
    "taxonCreateOrUpdate": {
      "status": 200,
      "errors": null,
      "taxon": {
        "id": "VGF4b24tNQ=="
      }
    }
  }
}
Retain the taxon
idas we’ll need it in the next step.
Variable Set for Cellular Internet
{
  "input": {
    "prototypeId": "UHJvdG90eXBlLTQ=",
    "parentId": "VGF4b24tNQ==",
    "displayName": "Cellular Internet",
    "title": "Cellular Internet"
  }
}