Click and Collect
6 minute read
What you’ll learn
In this article you’ll learn:
- Key terms and concepts
- How click and collect ordering works
- How to identify invoices as Click and Collect
- How to move those invoices through the Click and Collect lifecycle
Key terms and concepts
The diagram below illustrates the relationship between Order, Invoices and Line Items:
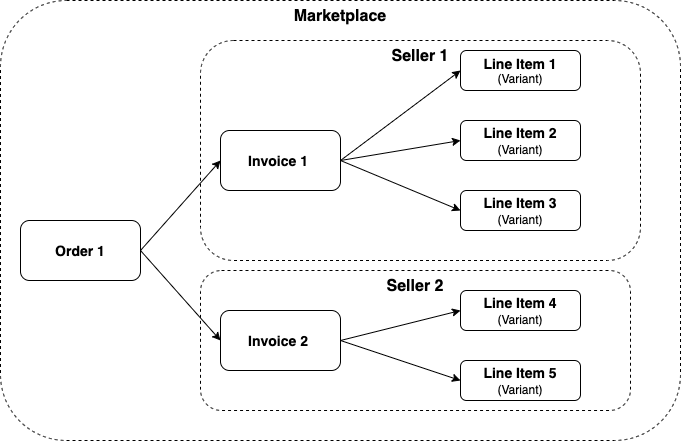
Put simply:
- A Seller is an individual entity (usually a business) that the marketplace operator has invited to sell on their marketplace. Multiple sellers can “participate” in a single order.
- An Order is the “marketplace-level” object that acts as the container for a customer’s entire purchase. An
orderobject in Marketplacer will always have at least 1 Invoice attached to it. - An invoice is the individual seller’s “view” of the order. Given that we are dealing with a marketplace, it is conceivable that customers will purchase items from 1 or more Sellers. It is therefore necessary to “split” the order into seller-level components, in this case the
invoiceobject. Even if there is only 1 seller participating in the transaction, there will still be aninvoicecreated on theorder - A Line Item is the individual item that a customer will purchase. Line items start their journey as Variants placed for sale on the marketplace by the seller. When a
variantobject is purchased alineItemobject is created.
Click and collect ordering
By default, (and in most cases), operators create orders by supplying a list of line items, which default to having a deliveryType of BUY_ONLINE. This means that those line items will be delivered by post.
Operators can elect to define the deliveryType for each line item, and in the case of click and collect this would be a deliveryType of CLICK_AND_COLLECT.
Mixed delivery types
Going further, operators can specify different deliveryTypes across multiple line items on an order, which could span multiple sellers. The rules here would be as follows:
- An order will still be split into invoices for each seller
- If an single seller has line items that have different delivery types, this will result in further splitting that sellers invoice into :
- 1 x Invoice containing all the
BUY_ONLINEline items - 1 x Invoice containing all the
CLICK_AND_COLLECTline items
- 1 x Invoice containing all the
An example of how orders are further split down into invoices when there are multiple sellers with mixed delivery types is shown below:
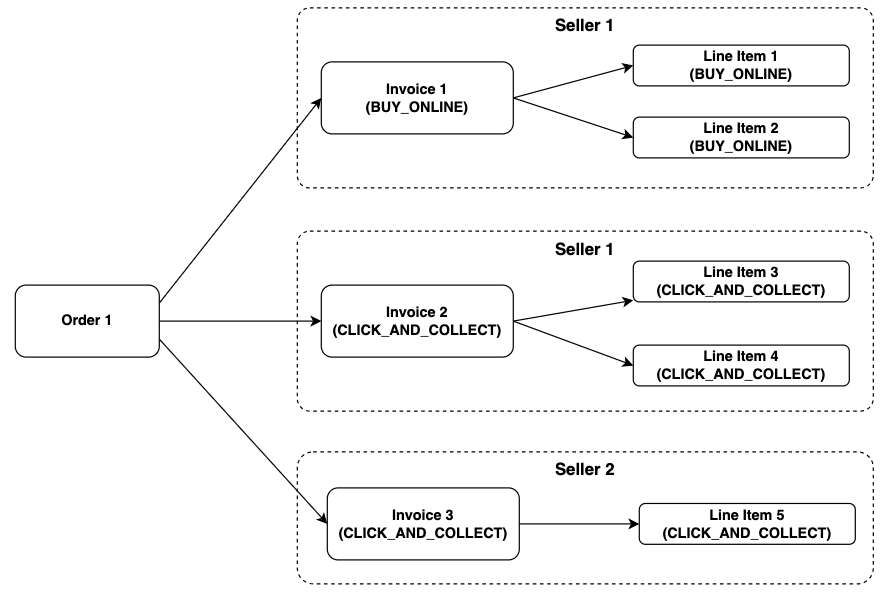
The key takeaway here is that if there are click and collect items, these will be contained in a click and collect invoice. It is this click and collect invoice that we are going to be working with in the rest of this article.
State transitions
Before we look at how we can identify click and collect invoices via GraphQL, it’s worth going through the happy path state transition for click and collect invoices:

The states are quite self-explanatory and it is the Seller that will transition the invoice through the various states, in this article we’ll use the API to do it.
Identifying click and collect invoices
This article discusses how you can use the
invoicesquery to return invoices from Marketplacer, so we’ll build on that to query for invoices that are click and collect.
Example 1
The easiest way to identify a click and collect invoice is to look at the value of the deliveryType field for that invoice, an example is shown below:
query GetInvoices(
  $first: Int
  $after: String
  $sort: InvoiceSort
) {
  invoices(first: $first, after: $after, sort: $sort) {
    totalCount
    pageInfo {
      hasNextPage
      endCursor
    }
    nodes {
      id
      legacyId
      deliveryType
      statusFlags
    }
  }
}
{
  "first": 5,
  "after": null,
  "sort": {
    "fields": "CREATED_AT",
    "ordering": "DESCENDING"
  }
}
An example response is shown below
{
  "data": {
    "invoices": {
      "totalCount": 16,
      "pageInfo": {
        "hasNextPage": true,
        "endCursor": "NQ"
      },
      "nodes": [
        {
          "id": "SW52b2ljZS0xMDAxNA==",
          "legacyId": 10014,
          "deliveryType": "CLICK_AND_COLLECT"
        },
        {
          "id": "SW52b2ljZS0xMDAxNQ==",
          "legacyId": 10015,
          "deliveryType": "BUY_ONLINE"
        },
        {
          "id": "SW52b2ljZS0xMDAxMw==",
          "legacyId": 10013,
          "deliveryType": "BUY_ONLINE"
        },
        {
          "id": "SW52b2ljZS0xMDAxMg==",
          "legacyId": 10012,
          "deliveryType": "CLICK_AND_COLLECT"
        },
        {
          "id": "SW52b2ljZS0xMDAxMQ==",
          "legacyId": 10011,
          "deliveryType": "CLICK_AND_COLLECT"
        }
      ]
    }
  }
}
As you can see this brings back BUY_ONLINE and CLICK_AND_COLLECT orders, so you would need to filter the results on the client side.
Example 2
In this example we’ll start to use filters to identify click and collect orders that are in either the READY or COLLECTED states.
NOTE: This query will not identify click and collect orders that are in the
PAIDstate. This status could be added to our query but it would return non-click and collect orders too.
query GetInvoicesByStatus(
  $first: Int
  $after: String
  $filters: InvoiceFilters
  $sort: InvoiceSort
) {
  invoices(first: $first, after: $after, filters: $filters, sort: $sort) {
    totalCount
    pageInfo {
      hasNextPage
      endCursor
    }
    nodes {
      id
      legacyId
      deliveryType
      statusFlags
    }
  }
}
{
  "first": 5,
  "after": null,
  "filters": {
    "statuses": [
      "READY",
      "COLLECTED"
    ]
  },
  "sort": {
    "fields": "CREATED_AT",
    "ordering": "DESCENDING"
  }
}
An example response is shown below
{
  "data": {
    "invoices": {
      "totalCount": 3,
      "pageInfo": {
        "hasNextPage": false,
        "endCursor": "Mw"
      },
      "nodes": [
        {
          "id": "SW52b2ljZS0xMDAxMQ==",
          "legacyId": 10011,
          "deliveryType": "CLICK_AND_COLLECT",
          "statusFlags": [
            "PAID",
            "READY"
          ]
        },
        {
          "id": "SW52b2ljZS0xMDAxMA==",
          "legacyId": 10010,
          "deliveryType": "CLICK_AND_COLLECT",
          "statusFlags": [
            "PAID",
            "COLLECTED"
          ]
        },
        {
          "id": "SW52b2ljZS0xMDAwNw==",
          "legacyId": 10007,
          "deliveryType": "CLICK_AND_COLLECT",
          "statusFlags": [
            "PAID",
            "READY"
          ]
        }
      ]
    }
  }
}
Example 3
The 3rd example makes use of another query filter called: awaitingCollection which if set to true will return only invoices in the READY state.
NOTE: Setting this value to false brings back all invoices except those that have been collected (
COLLECTEDstate) which includes non click and collect orders.
query GetInvoicesByStatus(
  $first: Int
  $after: String
  $filters: InvoiceFilters
  $sort: InvoiceSort
) {
  invoices(first: $first, after: $after, filters: $filters, sort: $sort) {
    totalCount
    pageInfo {
      hasNextPage
      endCursor
    }
    nodes {
      id
      legacyId
      deliveryType
      statusFlags
    }
  }
}
{
  "first": 5,
  "after": null,
  "filters": {
    "awaitingCollection": false
  },
  "sort": {
    "fields": "CREATED_AT",
    "ordering": "DESCENDING"
  }
}
An example response is shown below
{
  "data": {
    "invoices": {
      "totalCount": 2,
      "pageInfo": {
        "hasNextPage": false,
        "endCursor": "Mg"
      },
      "nodes": [
        {
          "id": "SW52b2ljZS0xMDAxMQ==",
          "legacyId": 10011,
          "deliveryType": "CLICK_AND_COLLECT",
          "statusFlags": [
            "PAID",
            "READY"
          ]
        },
        {
          "id": "SW52b2ljZS0xMDAwNw==",
          "legacyId": 10007,
          "deliveryType": "CLICK_AND_COLLECT",
          "statusFlags": [
            "PAID",
            "READY"
          ]
        }
      ]
    }
  }
}
Transitioning state
The remaining action that you’ll want to undertake as a seller, would be to transition click and collect invoices through its different states. This is done with the clickAndCollectStatusUpdate as shown below:
mutation setInvoiceToCollected($input: ClickAndCollectStatusUpdateMutationInput!) {
  clickAndCollectStatusUpdate(
    input: $input
  ) {
    errors {
      field
      messages
    }
    invoice {
      statusFlags
    }
  }
}
{
  "input": {
    "invoiceId": "SW52b2ljZS0xMDAxMQ==",
    "status": "COLLECTED"
  }
}
An example response is shown below where we transitioned the invoice into the COLLECTED state.
{
  "data": {
    "clickAndCollectStatusUpdate": {
      "errors": null,
      "invoice": {
        "statusFlags": [
          "PAID",
          "COLLECTED"
        ]
      }
    }
  }
}