How to work with Product Images
9 minute read
What you’ll learn
- The high-level image ingestion & retrieval flow
- Supported image formats & other considerations
- How to use
advertUpsertto add, update and delete images on an Advert (and Variant) - How to query images via the
advertobject
Images in general
This article focuses on Product (Advert) image manipulation, but images can be attached to other entities in the API, e.g. Sellers, Refund Requests etc. The same general principles apply as the underlying vehicles for image ingestion and retrieval are exactly the same in all cases.Image Ingestion Flow
The high-level image ingestion flow is shown below:

The major points to note are:
- The
ImageInputtype is the GraphQL type used to add, update & delete images, we’ll cover its use in the context of theadvertUpsertmutation, however it’s used by other mutations as well. As depicted it can accept either:- Image URLs
- Base 64 Encoded Images
- If the image is supplied as a URL, the URL must be accessible to the Marketplacer App as we retrieve a copy of that image for storage - see further considerations below.
- Images are then stored in Marketplacer storage for future retrieval
Image formats & other considerations
- Supported image formats are: PNG, GIF, JPG & JPEG
- File size must be under 32Mb
- Image URLs must be:
- Accessible to the Marketplacer App (see point #2 above)
- If image URLs are protected by a Web Application Firewall (WAF), rules will need to be in place to allow the Marketplacer App to retrieve
- URls must be resolvable in under 5s, otherwise a failure condition may be raised via the API
Image Retrieval Flow
The high-level image retrieval flow is shown below:
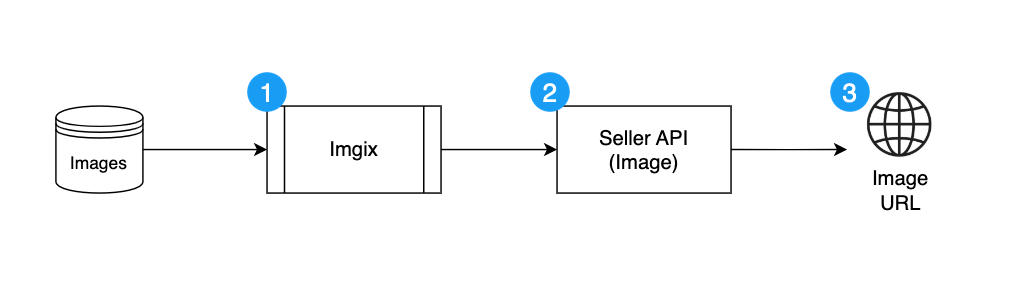
The major point to note are:
- We use a 3rtd party image processing service (Imgix) that works in concert with the Marketplacer API to allow things like image resizing, cropping etc.
- NOTE: as an API consumer you only work directly with the Marketplacer API
- Images are surfaced in the API via the
imageobject, we’ll cover this in more detail when we look at some examples - Images are returned to the API consumer as a URL. These URLs can be used to retrieve the image for further processing / caching into a Digital Asset Management (DAM) system or similar.
Usage of URLs for presentation
The direct embedding of the Marketplacer generate IMGIX URLs in a frontend (e.g. an eCommerce application) is not supported by Marketplacer. It is expected that the image URLs are used for ingestion purposed only (e.g. into a DAM).Using advertUpsert
In this section we’ll use the advertUpsert mutation (which uses a ImageInput) to perform the following actions:
- Add new images
- Update images
- Delete images
The general principles around working with images are:
- Adding new images is simply a case of supplying valid details for that image
- If there are existing images attached to the advert - and you are adding more (new) images:
- If you don’t supply the existing image id with the call to add a new image, then existing images will be removed - it is not an accumulative call
- If there are existing images attached to the advert - and you are updating advert attributes other than images:
- The existing images will remain in place
We’ll cover these use-cases below.
Scenario 1: Adding New Images (with no existing images)
In this scenario the Advert has no existing images, and we want to add one. We do this as follows using advertUpsert:
mutation addImageToProduct {
  advertUpsert(
    input: {
      advertId: "QWR2ZXJ0LTEwMDA5Mjc3OA=="
      attributes: {
        attemptAutoPublish: true
        images: [
          {
            sourceUrl: "https://picsum.photos/seed/W6SuzFkn8G/640/480"
            alt: "Picture of a T-Shirt"
          }
        ]
      }
    }
  ) {
    status
    advert {
      id
      images {
        nodes {
          id
          url
          alt
        }
      }
    }
    errors {
      field
      messages
    }
  }
}
The call will return the following payload (you’ll note that we have 1 image attached to the product now):
{
  "data": {
    "advertUpsert": {
      "status": 200,
      "advert": {
        "id": "QWR2ZXJ0LTEwMDA5Mjc3OA==",
        "images": {
          "nodes": [
            {
              "id": "SW1hZ2UtMzE0MjQz",
              "url": "https://marketplacer.imgix.net/yh/4M4lrzyN5NkRaWvhBMkIPE-Qg.jpg?auto=format&fm=pjpg&fit=max&w=&h=&s=b43dbb17bbf167500e5f85f1da3795f2",
              "alt": "Picture of a T-Shirt"
            }
          ]
        }
      },
      "errors": null
    }
  }
}
Scenario 2: Adding a new image (retain the existing image)
In this scenario we are working with the same product and want to add a new image, while retaining any existing images (we have 1 at the moment). This can be achieved via the following call to advertUpsert:
mutation addAndRetainImagesOnProduct {
  advertUpsert(
    input: {
      advertId: "QWR2ZXJ0LTEwMDA5Mjc3OA=="
      attributes: {
        attemptAutoPublish: true
        images: [
          {
            # Existing Image details
            imageId: "SW1hZ2UtMzE0MjQz",
            alt: "Picture of a T-Shirt" }
          {
            # New image
            sourceUrl: "https://picsum.photos/seed/UX8q3/640/480"
            alt: "Picture of a Man wearing a T-Shirt"
          }
        ]
      }
    }
  ) {
    status
    advert {
      id
      images {
        nodes {
          id
          url
          alt
        }
      }
    }
    errors {
      field
      messages
    }
  }
}
This will return the following;
{
  "data": {
    "advertUpsert": {
      "status": 200,
      "advert": {
        "id": "QWR2ZXJ0LTEwMDA5Mjc3OA==",
        "images": {
          "nodes": [
            {
              "id": "SW1hZ2UtMzE0MjQz",
              "url": "https://marketplacer.imgix.net/yh/4M4lrzyN5NkRaWvhBMkIPE-Qg.jpg?auto=format&fm=pjpg&fit=max&w=&h=&s=b43dbb17bbf167500e5f85f1da3795f2",
              "alt": "Picture of a T-Shirt"
            },
            {
              "id": "SW1hZ2UtMzE0MjQ0",
              "url": "https://marketplacer.imgix.net/iz/k-sFSTbndHT89I8oePpgnsgGU.jpg?auto=format&fm=pjpg&fit=max&w=&h=&s=bb30185a813de56eaa7fc28c93cff3f2",
              "alt": "Picture of a Man wearing a T-Shirt"
            }
          ]
        }
      },
      "errors": null
    }
  }
}
Scenario 3: Update 1 existing image and delete the other
In this example we’ll update the alt tag for an existing image (SW1hZ2UtMzE0MjQ0) and delete the other ("SW1hZ2UtMzE0MjQz), this can be achieved as follows:
mutation addUpdateAndRetainImageOnProduct {
  advertUpsert(
    input: {
      advertId: "QWR2ZXJ0LTEwMDA5Mjc3OA=="
      attributes: {
        attemptAutoPublish: true
        images: [
          {
            #Existing image
            imageId: "SW1hZ2UtMzE0MjQ0"
            alt: "Picture of a Woman wearing a T-Shirt"
          }
        ]
      }
    }
  ) {
    status
    advert {
      id
      images {
        nodes {
          id
          url
          alt
        }
      }
    }
    errors {
      field
      messages
    }
  }
}
You’ll note we’ve simply omitted the
imageIdof the image we want to remove in order to delete it.
This mutation call will result in the following response:
{
  "data": {
    "advertUpsert": {
      "status": 200,
      "advert": {
        "id": "QWR2ZXJ0LTEwMDA5Mjc3OA==",
        "images": {
          "nodes": [
            {
              "id": "SW1hZ2UtMzE0MjQ0",
              "url": "https://marketplacer.imgix.net/iz/k-sFSTbndHT89I8oePpgnsgGU.jpg?auto=format&fm=pjpg&fit=max&w=&h=&s=bb30185a813de56eaa7fc28c93cff3f2",
              "alt": "Picture of a Woman wearing a T-Shirt"
            }
          ]
        }
      },
      "errors": null
    }
  }
}
Scenario 4: Add a new advert using the Base64 method
So far we’ve added and updated images by supplying URL, in this scenario we are going to add an image using the base64 encoding method.
How do I base 64 encode an image?
Taking an image and encoding it as Base 64 is somewhat outside the scope of this document, and it would be expected that as part of your integration that you have a method for doing that.You can however find examples of how to perform Base64 file encoding in the code section.
To add a new image using the base 64 encoded method you call advertUpsert in the following way:
mutation addImageToProduct {
  advertUpsert(
    input: {
      advertId: "QWR2ZXJ0LTEwMDA5Mjc3OA=="
      attributes: {
        attemptAutoPublish: true
        images: [
          {
            alt: "Picture of a Woman wearing a T-Shirt"
            filename: "t-shirt.jpg"
            dataBase64: "/9j/4QDeRXhpZgAASUkqAAgAAAA...."
            # Redacted the full base 64 payload for brevity
          }
        ]
      }
    }
  ) {
    status
    advert {
      id
      images {
        nodes {
          id
          url
          alt
        }
      }
    }
    errors {
      field
      messages
    }
  }
}
Some points to note:
- When using the base 64 encoding method, a value for
filenameis required. - You can mix the approaches (url & base 64 )used to add images as shown in the following example:
mutation addImageToProduct {
  advertUpsert(
    input: {
      advertId: "QWR2ZXJ0LTEwMDA5Mjc3OA=="
      attributes: {
        attemptAutoPublish: true
        images: [
          {
            alt: "added via base 64"
            filename: "t-shirt.jpg"
            dataBase64: "/9j/4QDeRXhpZgAASUkqAAgAAAA...."
          }
          {
            sourceUrl: "https://picsum.photos/seed/rTPhP/640/480"
            alt: "added via url"
          }
        ]
      }
    }
  ) {
    status
    advert {
      id
      images {
        nodes {
          id
          url
          alt
        }
      }
    }
    errors {
      field
      messages
    }
  }
}
Using other mutations
As mentioned above, you can attach images to other objects, using other mutations. As an example, we’ll stick with the advertUpsert mutation, but this time the example illustrates how you can add images to the product (advert) variant.
mutation addImageToProduct {
  advertUpsert(
    input: {
      advertId: "QWR2ZXJ0LTEwMDA5Mjc3OA=="
      attributes: {
        attemptAutoPublish: true
        variants: {
          id: "VmFyaWFudC05OTg4NQ=="
          images: [
            {
              sourceUrl: "https://picsum.photos/seed/rTPhP/640/480"
              alt: "Red T-Shirt Variant"
            }
          ]
        }
      }
    }
  ) {
    status
    advert {
      id
      images {
        nodes {
          id
          url
          alt
        }
      }
      variants {
        nodes {
          id
          images {
            nodes {
              id
              url
              alt
            }
          }
        }
      }
    }
    errors {
      field
      messages
    }
  }
}
This would return:
{
  "data": {
    "advertUpsert": {
      "status": 200,
      "advert": {
        "id": "QWR2ZXJ0LTEwMDA5Mjc3OA==",
        "images": {
          "nodes": [
            {
              "id": "SW1hZ2UtMzE0MjQ2",
              "url": "https://marketplacer.imgix.net/Fm/04VDOYeXfRu2eIdIYI7juVrdQ?auto=format&fm=pjpg&fit=max&w=&h=&s=b2953fb7b5427b79d014bae5d323f98d",
              "alt": "added via base 64"
            },
            {
              "id": "SW1hZ2UtMzE0MjQ3",
              "url": "https://marketplacer.imgix.net/Ee/c_aIE-hT4xplw-o0iik9gd1No.jpg?auto=format&fm=pjpg&fit=max&w=&h=&s=6122dea4a671dfe094f765077985b95e",
              "alt": "added via url"
            }
          ]
        },
        "variants": {
          "nodes": [
            {
              "id": "VmFyaWFudC05OTg4NQ==",
              "images": {
                "nodes": [
                  {
                    "id": "SW1hZ2UtMzE0MjUw",
                    "url": "https://marketplacer.imgix.net/Ee/c_aIE-hT4xplw-o0iik9gd1No.jpg?auto=format&fm=pjpg&fit=max&w=&h=&s=6122dea4a671dfe094f765077985b95e",
                    "alt": "Red T-Shirt Variant"
                  }
                ]
              }
            }
          ]
        }
      },
      "errors": null
    }
  }
}
Here you can see we have a new image added to the variant, and the existing 2 images on the Advert remain (we did not make any attempt to update these - hence they remain in place).
The takeaway point here is that while we have focused on
advertUpsertandadverts, as long as the mutation uses theImageInputtype to attach images, the same methods discussed above can be employed.
Querying Product Images
This section focuses on how you can retrieve and “manipulate” images when querying them through the Seller API. In the examples that follow, we will be using a simple node query to return a single product (advert) based on its id.
For a deeper discussion on the different ways you can query products more generally, please refer to this article.
Scenario 1: Simple image retrieval
In this query, we simply request the available fields on an image object, we continue from our previous example where we have an product with 2 images:
query GetAdvert {
  node(id: "QWR2ZXJ0LTEwMDA5Mjc3OA==") {
    ... on Advert {
      id
      title
      images {
        nodes {
          url
          id
          alt
          filename
          size
          width
          height
          metadata
          position
        }
      }
    }
  }
}
This would return the following:
{
  "data": {
    "node": {
      "id": "QWR2ZXJ0LTEwMDA5Mjc3OA==",
      "title": "Practical Cotton Mouse",
      "images": {
        "nodes": [
          {
            "url": "https://marketplacer.imgix.net/Fm/04VDOYeXfRu2eIdIYI7juVrdQ?auto=format&fm=pjpg&fit=max&w=&h=&s=b2953fb7b5427b79d014bae5d323f98d",
            "id": "SW1hZ2UtMzE0MjQ2",
            "alt": "added via base 64",
            "filename": "t-shirt.jpg",
            "size": null,
            "width": null,
            "height": null,
            "metadata": "{\"alt\"=>\"added via base 64\"}",
            "position": 0
          },
          {
            "url": "https://marketplacer.imgix.net/Ee/c_aIE-hT4xplw-o0iik9gd1No.jpg?auto=format&fm=pjpg&fit=max&w=&h=&s=6122dea4a671dfe094f765077985b95e",
            "id": "SW1hZ2UtMzE0MjQ3",
            "alt": "added via url",
            "filename": "480.jpg",
            "size": 0,
            "width": 640,
            "height": 480,
            "metadata": "{\"alt\"=>\"added via url\", \"pixel_height\"=>480, \"pixel_width\"=>640}",
            "position": 1
          }
        ]
      }
    }
  }
}
For a detailed specification on the
imageobject please refer to the reference docs.
Scenario 2: Adjusting return image properties
As mentioned in the Image Retrieval Flow section, we use a 3rd party called Imgix to provide some additional image processing, this can be leveraged by further elaborating the url field of the image.
An example of this is shown below:
query GetAdvert {
  node(id: "QWR2ZXJ0LTEwMDA5Mjc3OA==") {
    ... on Advert {
      id
      title
      images {
        nodes {
          url(width: 200, height: 200, fit: fill, fillColor: "8844dd")
        }
      }
    }
  }
}
This would return the following:
{
  "data": {
    "node": {
      "id": "QWR2ZXJ0LTEwMDA5Mjc3OA==",
      "title": "Practical Cotton Mouse",
      "images": {
        "nodes": [
          {
            "url": "https://marketplacer.imgix.net/Fm/04VDOYeXfRu2eIdIYI7juVrdQ?auto=format&fm=pjpg&fit=fill&w=200&h=200&fill-color=8844dd&s=a8a88424ebeb8be6691f0f89999cc793"
          },
          {
            "url": "https://marketplacer.imgix.net/Ee/c_aIE-hT4xplw-o0iik9gd1No.jpg?auto=format&fm=pjpg&fit=fill&w=200&h=200&fill-color=8844dd&s=9a8e03947701aadb446cc874d87de614"
          }
        ]
      }
    }
  }
}
You can see that the request parameters are resident in the image urls, however you should note that you can only manipulate these values via the graphql query. Attempting to edit them directly in the url will result in a sig_invalid response, (the urls are signed with a checksum).
Examples of the original (non-processed) image, Vs. the processed image are shown below.
The original image:
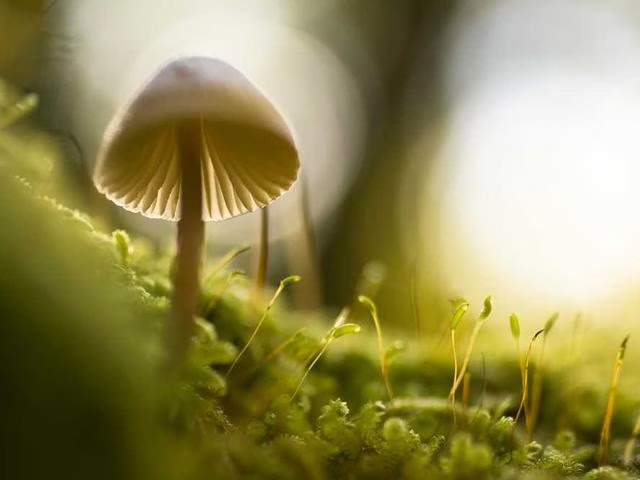
The processed image: