Creating Shipments
8 minute read
What you’ll learn
- The simplified Marketplacer shipment model
- The API calls you can use to create full or partial shipments
The Marketplacer Shipment Model
The diagram below illustrates the relationship between Invoices, Line Items and Shipments
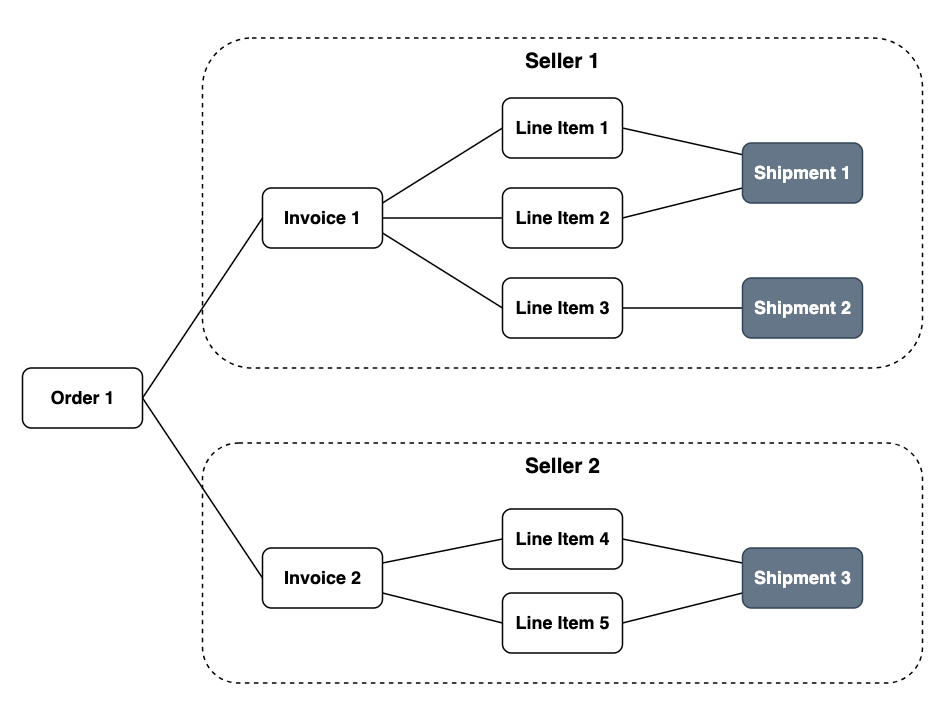
Put simply:
- A Seller is an individual entity (usually a business) that the marketplace operator has invited to sell on their marketplace. Multiple sellers can “participate” in a single order.
- An Order is the “marketplace-level” object that acts as the container for a customer’s entire purchase. An
orderobject in Marketplacer will always have at least 1 Invoice attached to it. - An invoice is the individual seller’s “view” of the order. Given that we are dealing with a marketplace, it is conceivable that customers will purchase items from 1 or more Sellers. It is therefore necessary to “split” the order into seller-level components, in this case the
invoiceobject. Even if there is only 1 seller participating in the transaction, there will still be aninvoicecreated on theorder - A Line Item is the individual item that a customer will purchase. There is a 1 to 1 relationship between a
LineItemobject and the AdvertVariantobject, (ultimately you purchase a variant and it becomes a line item on an invoice.) - Therefore each
LineItemobject represents a unique product, each Line Item has aquantityvalue of 1 or greater, representing the number of that particular variant that was purchased. - A Shipment represents the full or partial dispatch of Line Items. Shipments can be created with any of the following configurations:
- All Line Items (and all quantities of those Line Items) dispatched in 1 Shipment
- All quantities of some Line Items dispatched in 1 Shipment
- Partial quantities of all or some Line Items dispatched in 1 Shipment
The remainder of this article describes how you can create Shipments for those various configurations.
Creating Shipments
Before we start creating shipments, we must have an Invoice to work with, in the examples that follow we are going to work with a Invoice with the following structure:
New Order
Note: that for each example, I’ll recreate this order, which will mean that all theid and legacyId fields will obtain new values, the line items and quantities ordered will remain identical though.{
"data": {
"nodes": [
{
"__typename": "Order",
"id": "T3JkZXItMTMxNTg=",
"legacyId": 13158,
"invoices": {
"nodes": [
{
"id": "SW52b2ljZS0xMzI0OA==",
"legacyId": 13248,
"lineItems": [
{
"id": "TGluZUl0ZW0tMzU4OA==",
"legacyId": 3588,
"advertTitle": "Blue T-Shirt",
"variantId": "VmFyaWFudC0yNDAyNQ==",
"quantity": 3
},
{
"id": "TGluZUl0ZW0tMzU4OQ==",
"legacyId": 3589,
"advertTitle": "Cotton cat toy",
"variantId": "VmFyaWFudC03MTM3",
"quantity": 2
},
{
"id": "TGluZUl0ZW0tMzU5MA==",
"legacyId": 3590,
"advertTitle": "Nike Air Max",
"variantId": "VmFyaWFudC0xMDM5OA==",
"quantity": 1
}
]
}
]
}
}
]
}
}
Here you can see I have 1 Invoice with the following 3 line items:
- Blue T-Shirt (Quantity of 3)
- Cotton cat Toy (Quantity of 2)
- Nike Air Max (Quantity of 1)
Shipment Carriers
One of the mandatory fields on the shipmentCreate mutation that we are going to use next is postageCarrierId, this is a unique identifier for the Shipment Carriers that you have configured on your instance of Marketplacer. Therefore, before we explore shipmentCreate, lets first get a list of Shipment Carrier Ids by running the shipmentCarriers query as shown below:
query{
  shipmentCarriers{
    nodes{
      id
      name
    }
  }
}
On the instance of Marketplacer I’m running this returns the following list (note that you can configure this list of carriers to reflect your geography):
{
  "data": {
    "shipmentCarriers": {
      "nodes": [
        {
          "id": "U2hpcG1lbnRDYXJyaWVyLTcz",
          "name": "DHL"
        },
        {
          "id": "U2hpcG1lbnRDYXJyaWVyLTc3",
          "name": "FedEx"
        },
        {
          "id": "U2hpcG1lbnRDYXJyaWVyLTc3",
          "name": "TNT"
        },
        {
          "id": "U2hpcG1lbnRDYXJyaWVyLTc3",
          "name": "US Post"
        }
      ]
    }
  }
}
In our examples we’ll dispatch with FedEx, so we’ll use the ID of U2hpcG1lbnRDYXJyaWVyLTc3.
Shipped from addresses
When creating a shipment, a Seller can elect to provide the shipped from address. Knowing the origin of where the shipment was sent from can allow the operator to:
- Pass this information on to the customer should then need to return it
- Calculate an estimated delivery time
Note: This information is optional when creating a shipment
Creating shipped from addresses
Sellers can have a number of shipped from addresses, for example they may have 1 address for each of the distribution centers they run. Sellers can add shipped from addresses to their collection by using the shipmentAddressCreate mutation as shown below:
mutation {
  shipmentAddressCreate(
    input: {
      address: {
        address: "81 Market Street"
        city: "Melbourne"
        postcode: "3000"
        state: { name: "Victoria" }
        country: { code: "AU" }
      }
    }
  ) {
    address {
      id
    }
    errors {
      messages
      field
    }
  }
}
The seller can then query their shipped from addresses using the shipmentAddresses query as shown below:
query {
  shipmentAddresses(sellerId: "U2VsbGVyLTY2MDExOQ==", first: 5) {
    totalCount
    pageInfo {
      hasNextPage
      endCursor
    }
    nodes {
      id
      address
      city
      state {
        name
      }
      postcode
      country {
        code
      }
    }
  }
}
This would return something like:
{
  "data": {
    "shipmentAddresses": {
      "totalCount": 2,
      "pageInfo": {
        "hasNextPage": false,
        "endCursor": "Mg"
      },
      "nodes": [
        {
          "id": "QWRkcmVzcy04NDMw",
          "address": "80 Market Street",
          "city": "Melbourne",
          "state": {
            "name": "Victoria"
          },
          "postcode": "3000",
          "country": {
            "code": "AU"
          }
        },
        {
          "id": "QWRkcmVzcy04NDMx",
          "address": "81 Market Street",
          "city": "Melbourne",
          "state": {
            "name": "Victoria"
          },
          "postcode": "3000",
          "country": {
            "code": "AU"
          }
        }
      ]
    }
  }
}
When creating a shipment using the shipmentCreate mutation (see examples below) the seller can then set the shippedFromId to the id of one of their shipped from addresses.
Once a shipment has been created then this information can be accessed via the shippedFrom object attached to the shipment.
Example 1
Starting with the simplest example, we’ll just dispatch all Line Items with all quantities, we do this by executing the following mutation:
mutation {
	shipmentCreate(
		input: {
			invoiceId: "SW52b2ljZS0xMzI0OA=="
			dispatchedAt: "2023-06-05"
			note: "An example note"
			postageCarrierId: "U2hpcG1lbnRDYXJyaWVyLTcz"
			shippedFromId: "QWRkcmVzcy04NDM"
			trackingNumber: "12234"
			shippedItems: [
				{
					lineItemId: "TGluZUl0ZW0tMzU4OA=="
					quantity: 3
				}
				{
					lineItemId: "TGluZUl0ZW0tMzU4OQ=="
					quantity: 2
				}
				{
					lineItemId: "TGluZUl0ZW0tMzU5MA=="
					quantity: 1
				}
			]
		}) {
		errors {
			field
			messages
		}
		shipment {
			id
			createdAt
		}
	}
}
Running this mutation in this instance will return:
{
  "data": {
    "shipmentCreate": {
      "errors": null,
      "shipment": {
        "id": "U2hpcG1lbnQtNzQ5",
        "createdAt": "2023-06-05T11:17:52+10:00"
      }
    }
  }
}
Example 2
In this example we are 1st going to dispatch only the Blue T-Shirt Line Item (all 3), then create a 2nd Shipment for the other 2 line items.
Remember that as I’ve created a new order this example, the
invoiceIdandlineItemIdsnow have different values to those used in Example 1.
mutation {
	shipmentCreate(
		input: {
			invoiceId: "SW52b2ljZS0xMzI0OQ=="
			dispatchedAt: "2023-06-05"
			note: "An example note"
			postageCarrierId: "U2hpcG1lbnRDYXJyaWVyLTcz"
			trackingNumber: "12234"
			shippedItems: [
				{
					lineItemId: "TGluZUl0ZW0tMzU5MQ=="
					quantity: 3
				}

			]
		}) {
		errors {
			field
			messages
		}
		shipment {
			id
			createdAt
		}
	}
}
Running this, will create 1 Shipment for just the Blue T-Shirt.
We can then place a 2nd call to dispatch the Cotton cat toy and the Nike Air Max shoes, as follows:
mutation {
	shipmentCreate(
		input: {
			invoiceId: "SW52b2ljZS0xMzI0OQ=="
			dispatchedAt: "2023-06-05"
			note: "An example note"
			postageCarrierId: "U2hpcG1lbnRDYXJyaWVyLTcz"
			trackingNumber: "12234"
			shippedItems: [
				{
					lineItemId: "TGluZUl0ZW0tMzU5Mg=="
					quantity: 2
				}
				{
					lineItemId: "TGluZUl0ZW0tMzU5Mw=="
					quantity: 1
				}
			]
		}) {
		errors {
			field
			messages
		}
		shipment {
			id
			createdAt
		}
	}
}
If we query the Invoice, and return the shipments attached to it we’d see the following payload:
You can read about querying invoices in this article.
{
  "data": {
    "nodes": [
      {
        "__typename": "Order",
        "id": "T3JkZXItMTMxNTk=",
        "legacyId": 13159,
        "invoices": {
          "nodes": [
            {
              "id": "SW52b2ljZS0xMzI0OQ==",
              "legacyId": 13249,
              "shipments": [
                {
                  "id": "U2hpcG1lbnQtNzUw",
                  "dispatchedAt": "2023-06-05T11:32:13+10:00",
                  "shippedItems": [
                    {
                      "id": "U2hpcHBlZEl0ZW0tODY1",
                      "lineItem": {
                        "id": "TGluZUl0ZW0tMzU5MQ=="
                      },
                      "quantity": 3
                    }
                  ]
                },
                {
                  "id": "U2hpcG1lbnQtNzUx",
                  "dispatchedAt": "2023-06-05T11:35:43+10:00",
                  "shippedItems": [
                    {
                      "id": "U2hpcHBlZEl0ZW0tODY2",
                      "lineItem": {
                        "id": "TGluZUl0ZW0tMzU5Mg=="
                      },
                      "quantity": 2
                    },
                    {
                      "id": "U2hpcHBlZEl0ZW0tODY3",
                      "lineItem": {
                        "id": "TGluZUl0ZW0tMzU5Mw=="
                      },
                      "quantity": 1
                    }
                  ]
                }
              ]
            }
          ]
        }
      }
    ]
  }
}
Here you can see that we have 2 separate shipments on the invoice with the shippedItems representing the line items we have dispatched.
Example 3
In this example, we 1st dispatch partial quantities of the 1st 2 line items, then create a 2nd shipment for the remaining quantities and the last line item as follows:
mutation {
	shipmentCreate(
		input: {
			invoiceId: "SW52b2ljZS0xMzI1MQ=="
			dispatchedAt: "2023-06-05"
			note: "An example note"
			postageCarrierId: "U2hpcG1lbnRDYXJyaWVyLTcz"
			trackingNumber: "12234"
			shippedItems: [
				{
					lineItemId: "TGluZUl0ZW0tMzU5Nw=="
					quantity: 2
				}
				{
					lineItemId: "TGluZUl0ZW0tMzU5OA=="
					quantity: 1
				}

			]
		}) {
		errors {
			field
			messages
		}
		shipment {
			id
			createdAt
		}
	}
}
In this call we dispatch 2/3 Blue T-Shirts and 1/2 Cotton cat toys, leaving:
- 1 remaining Blue T-Shirt
- 1 remaining Cotton Cat Toy
- 1 remaining Nike Air Max
To fully dispatch the remaining items we make the following call:
mutation {
	shipmentCreate(
		input: {
			invoiceId: "SW52b2ljZS0xMzI1MA=="
			dispatchedAt: "2023-06-05"
			note: "An example note"
			postageCarrierId: "U2hpcG1lbnRDYXJyaWVyLTcz"
			trackingNumber: "12234"
			shippedItems: [
				{
					lineItemId: "TGluZUl0ZW0tMzU5NA=="
					quantity: 1
				}
				{
					lineItemId: "TGluZUl0ZW0tMzU5NQ=="
					quantity: 1
				}
				{
					lineItemId: "TGluZUl0ZW0tMzU5Ng=="
					quantity: 1
				}
			]
		}) {
		errors {
			field
			messages
		}
		shipment {
			id
			createdAt
		}
	}
}