Managing Secondary Users
5 minute read
What you’ll learn
In this how to guide you’ll learn:
- What are Secondary Users
- How to work with the Seller object
- How to list, create, update and delete secondary users with the Seller API
What is a Secondary User?
When a Seller account is set up on Marketplacer, a Primary User is created along with the Seller entity - this user can then manage all aspects of the seller account. This arrangement is usually sufficient for smaller seller organizations.
Larger seller organizations usually have a requirement for more than 1 individual to manage the seller account, therefore we have a need to add more users - we call these Secondary Users.
While the management of these users can be undertaken in the Seller Portal, the remainder of this article focuses on how you can manage users with the Seller API.
Prerequisites
It is assumed that if you are following along with this article that you have created a Seller API Key and have downloaded a tool like Postman or Insomnia to make API calls.
More information on these steps can be found in the Seller API Getting Started Guide.
Managing Users
Working with the Seller object
Some aspects of managing Secondary Users, require the use of the Seller object (the seller object represents the entire Seller entity on Marketplacer), a representation of this concept is shown below.
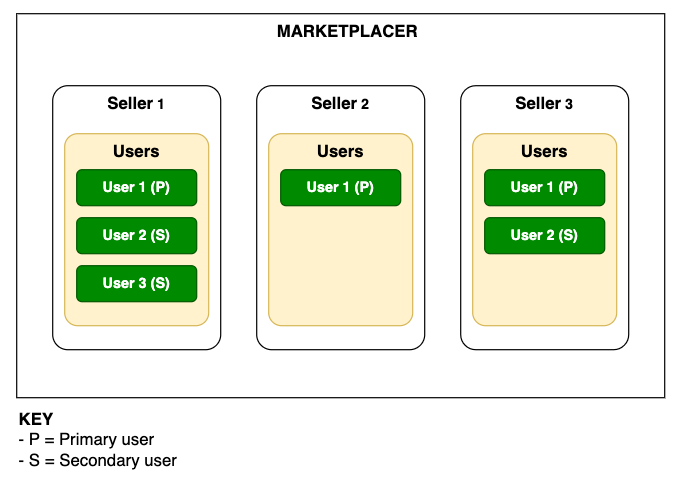
So for example if you want to obtain a list of all the users for a Seller you can do so via the Seller object. This is something you’d usually do before performing some kind of management operation on a user, e.g. Deleting them.
Scope of what you can do
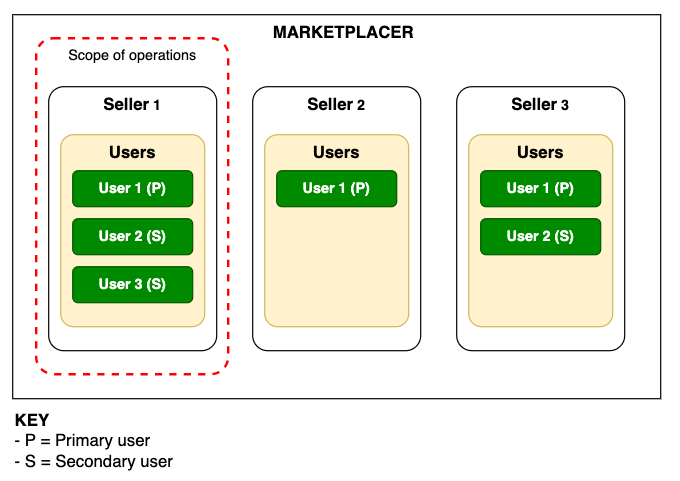
One question you may have at this point is whether you can use the Seller API to manipulate or view the users of another Seller account - the answer to this is of course no. The Seller API key that you generate limits, or “scopes”, the operations that you can perform to just your Seller entity.
So for example if you are working as a user contained in Seller 1, your privileged operations are scoped only to that seller - see below:
With all this in mind, to generate a list of all the users for a seller entity you can run the following query:
query GetSellersUsers {
  sellerSearch(attributes: { businessName: "Cell Phones 4U" }) {
    sellers {
      nodes {
        id
        businessName
        users(first: 10) {
          nodes {
            id
            surname
            firstName
            emailAddress
          }
        }
      }
    }
  }
}
This query:
- Accepts a search criteria for your Business Name, (in the example this is Cell Phones 4U)
- This should limit the result set to just your seller (NOTE:) sellers with similar names may be returned in your result set but you will not be able to see privileged information for those sellers.
- Limits the number of users to the first 10, to obtain further users (assuming there are any) you would need to use pagination.
An example result set for this query is shown below:
{
  "data": {
    "sellerSearch": {
      "sellers": {
        "nodes": [
          {
            "id": "U2VsbGVyLTY2MDExOQ==",
            "businessName": "Cell Phones 4U", ⬅️ Your seller entity
            "users": {
              "nodes": [  ⬅️ Your list of users
                {
                  "id": "VXNlci01MDA=",  ⬅️ Id of this User
                  "surname": "Davidson",
                  "firstName": "Peter",
                  "emailAddress": "817102cf-0092-4555-9812-1f92c636671a@email.com"
                },
                {
                  "id": "VXNlci01MjI=",  ⬅️ Id of this User
                  "surname": "Baker",
                  "firstName": "Tom",
                  "emailAddress": "9e4a2052-8d40-4701-aad3-0f09ba5e86e0@email.com"
                }
              ]
            }
          },
          null ⬅️ Represents another seller returned by the query
        ]         from which you are blocked on seeing
      }
    }
  },
  "errors": [  ⬅️ Errors related to attempting to access another
    {             sellers users
      "message": "Not authorized to access Seller.users",
      "locations": [
        {
          "line": 7,
          "column": 5
        }
      ],
      "path": [
        "sellerSearch",
        "sellers",
        "nodes",
        1,
        "users"
      ]
    }
  ]
}
You can see in this example the scope protection kicked in and you were blocked from seeing another (similarly named) seller’s users.
What’s important about these query results are the id values of each user, as it is these ids that we use with some of the other user-management operations, e.g. deleting a user.
Creating a Secondary User
You can of course create secondary users using the Seller API, the following operation (or mutation) shows how this can be performed:
mutation {
  userCreate(
    input: {
      attributes: {
        username: "mccoys"
        firstName: "Sylvester"
        surname: "McCoy"
        emailAddress: "s.mccoy@email.com"
      }
    }
  ) {
    user {
      id
      firstName
      emailAddress
    }
    errors {
      field
      messages
    }
  }
}
This would result in the following response:
{
  "data": {
    "userCreate": {
      "user": {
        "id": "VXNlci01MjY=",
        "firstName": "Sylvester",
        "emailAddress": "s.mccoy@email.com"
      },
      "errors": null
    }
  }
}
Here you can see we have no errors, and we are returned the user object (including their id which gets created for us as part of this operation).
Deleting a Secondary User
To delete a user you will need the id of the user, refer to the step above to get these. Assuming you then have the id of the user you want to delete, you would execute the following operation:
mutation {
  userDelete(input: { userId: "VXNlci01MjU=" }) {
    errors {
      field
      messages
    }
  }
}
Assuming we have no errors this operation would return the following response:
{
  "data": {
    "userDelete": {
      "errors": null
    }
  }
}
Updating a Secondary User
To update an existing user you can use the following operation, again you’ll need the user id:
NOTE: that you can only update your own user account, and not the accounts of other users
mutation {
  userUpdate(
    input: {
      userId: "VXNlci01MDA="
      attributes: {
        username: "pcapaldi"
        surname: "Capaldi"
        firstName: "Peter"
        emailAddress: "p.capaldi@email.com"
      }
    }
  ) {
    user {
      id
    }
    errors {
      field
      messages
    }
  }
}