Securing Webhooks
4 minute read
In this guide we cover:
- Why you may want to secure your webhooks
- Options for Securing Webhooks
Overview
Once you have set up and enabled webhooks on your Marketplacer instance, HTTP POST requests will start to flow to the endpoint of your choosing once relevant events are triggered, e.g.
- An Invoice Update event will be triggered when line items are shipped
- A Variant Update event will be triggered when inventory changes
The Marketplacer platform will only ever send these notifications to the endpoint of your choosing, (over HTTPS), but how can you be sure those POST requests came from Marketplacer?
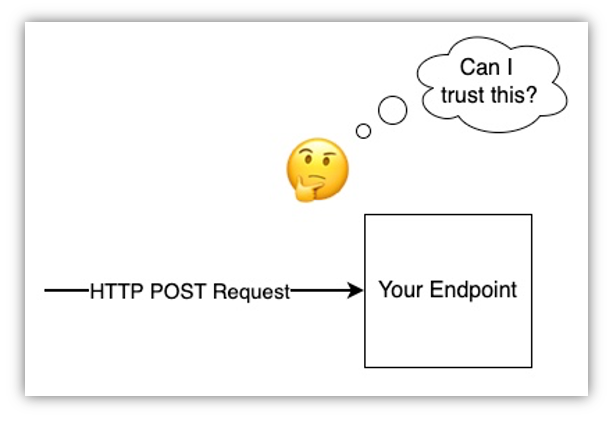
It is conceivable that an unauthorized 3rd party, upon learning of the existence of your endpoint either through automated or non-automated means, could start to send malicious traffic to your endpoint…
This is why you’ll typically want to put in some form of validation check to ensure that the HTTP requests you get have come from an authorized source, in this case Marketplacer.
Options for Securing Webhooks
IP Whitelisting
IP Whitelisting is often discussed when talking about how to restrict inbound traffic to your network. It works on the premise that you “know” the all IP addresses of the endpoints that you want to permit on your network, (e.g. Marketplacer). You add these IP addresses to a list (the “whitelist”) and then enforce access to your network based on those addresses.
IP Whitelisting therefore requires that IP addresses are “static” (i.e. they don’t change), otherwise you’d be continually reconfiguring the whitelist to ensure access continued unabated. With the emergence of cloud-hosted platforms, particularly those that host containerized apps, static IP Addressing is becoming less common, and as a result IP Whitelisting is used less.
Indeed it is for this reason that you cannot secure inbound Marketplacer webhooks based on an IP address, as these addresses can change at any time.
Why discuss IP whitelisting
While we don’t support IP Whitelisting we have included a brief discussion on it to round out the conversation and clarify the position on it.Option 1: Add a Key or Token Directly to the Header
Note
This method is available for both Operators & SellersAs discussed here,you can configure the headers that you want to attach to your Webhook requests. So one simple, (but effective), approach to securing your webhooks is to attach a “key” or “token” to the header and then upon receipt of the inbound webhook request, validate the header token matches what you’d expect.
An example of how to configure this in Marketplacer is shown below.
- Navigate to Webhooks Admin Page
- Either:
- Follow the steps to create a new webhook, or:
- Edit an existing webhook
- Update the Headers section as required
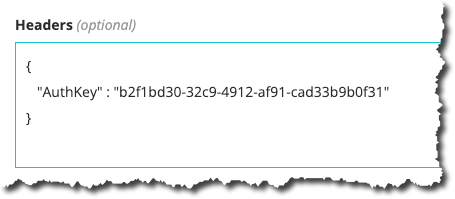
In this example we have added 1 new header with:
- A Key of
AuthKey(you can name this as required) - A Value of
b2f1bd30-32c9-4912-af91-cad33b9b0f31(use your own value here!)
When the webhook is then received at the endpoint you’ll need to parse the headers and compare the value present for AuthKey.
A coded example can be found here for Operators and here for Sellers
Option 2: Use a HMAC Key
Note
This method is only available for Operator-based webhooks.The 2nd (more secure) option is to use a HMAC Key, which will be used to produce an encrypted hash attached to the header of the webhook request.
This is explained in more detail below.
What is HMAC?
HMAC is a specific type of Message Authentication Code (MAC) involving a cryptographic hash function, a secret key and a range of “arbitrary bits”. In simple terms it works as depicted below:
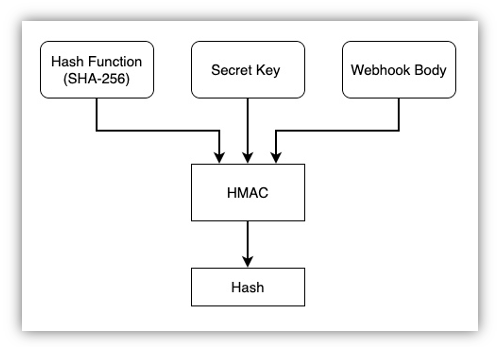
HMAC relies upon:
- A Cryptographic Hash function. In this example we are using SHA-256
- A Secret Key. This can be any arbitrary string (supplied by the operator)
- Webhook Body. In this case we are using the body of the webhook request as the “arbitrary bits” required by HMAC
What results from this is a Hash that is guaranteed to be unique, it is this value that we will attach (as a header) to your webhook requests if you choose to configure HMAC.
Using a HMAC Key with Marketplacer Webhooks
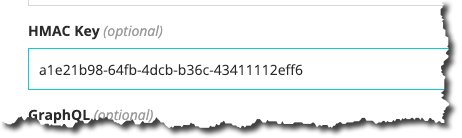
To configure your webhooks to use HMAC, you just need to supply value for the secret as follows:
- Navigate to Webhooks Admin Page
- Either:
- Follow the steps to create a new webhook, or:
- Edit an existing webhook
- Enter a value in the HMAC Key Field
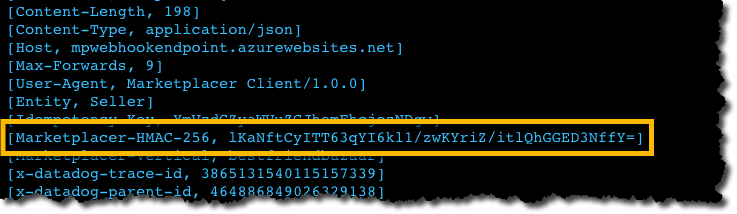
All your webhooks will now have a Marketplacer-HMAC-256 HTTP Header attached with Hash value produced as described above. An example header payload with this header is depicted below:
Upon receipt of the webhook HTTP POST request you will need to check that the hash value sent is valid. To do so you will effectively need to generate a hash value yourself, (ensure you use Base64 encoding), using the same parameters outlined above, which are:
- SHA-256 Hash Function
- HMAC Secret
- The HTTP POST Body value
A coded example can be found here for Operators and here for Sellers