Consuming & processing webhooks with Huginn
18 minute read
What you’ll learn
In this guide you’ll learn:
- How to configure webhooks in Marketplacer
- How to consume Marketplacer webhooks using Huginn
- How to use Huginn to process those webhooks and emit further conditional events
- How to configure Slack so that it can receive messages from other systems (e.g. Huginn)
🎥 Note: A companion video for this playbook is available where we step through the major solution components and run a demo.
Solution components
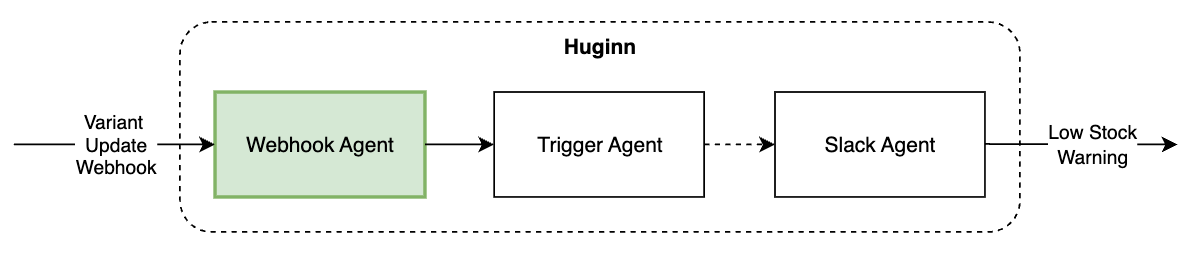
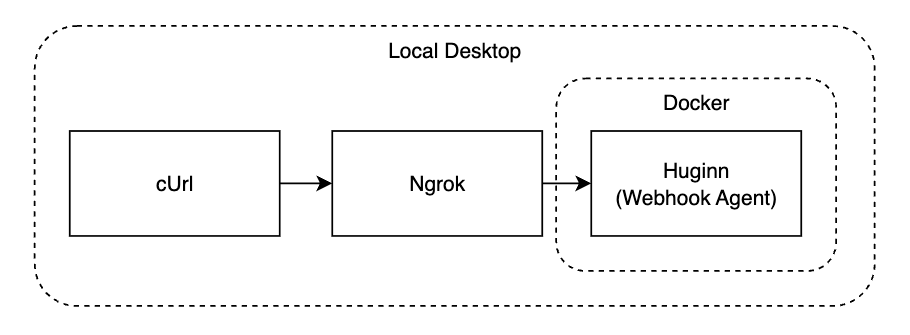
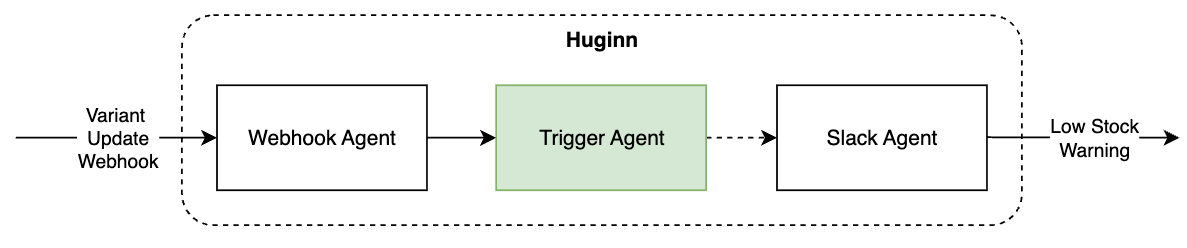
The following diagram depicts what we are going to set up and work with today:
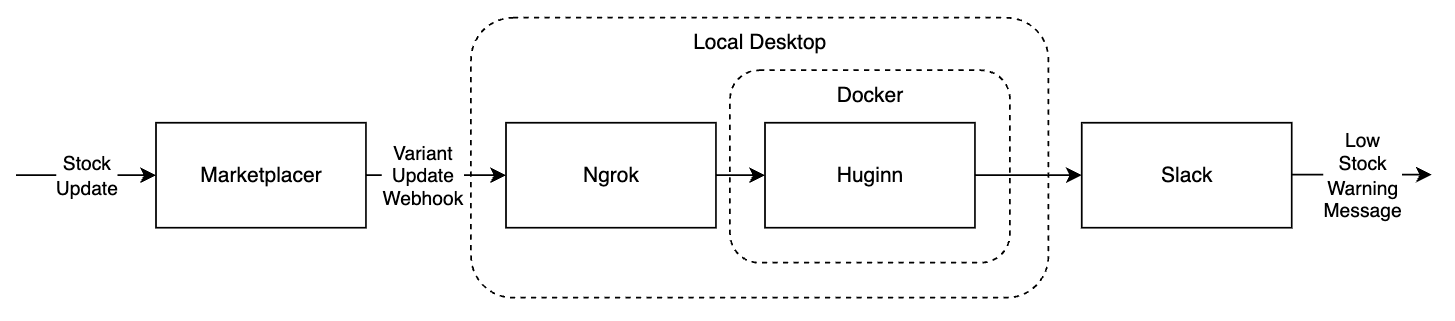
We describe each of these components in more detail below.
Marketplacer
Marketplacer hosts products from multiple sellers that will be surfaced and sold on the marketplace frontend. In this scenario we are going to:
- Create a Variant Update webhook. This will fire anytime a product (aka advert) variant is updated
- We will simulate adjusting the stock-holding (referred to as
countOnHand) of a variant - resulting in the generation of a webhook to the configured destination, (in this case Ngrok)
Adverts and Variants
Products in Marktplacer are referred to as adverts. Adverts must have 1 or more variants. It is at the variant level that attributes such ascountOnhand (aka stock), barcodes, SKU etc. are stored. Ultimately when orders are placed by customers, it is the variant that is purchased.Local desktop
Aside from Marketplacer and Slack which are hosted SaaS offerings, the remaining solution components will be hosted on a local desktop - this is primarily for reasons of simplicity. Our desktop will host:
In a production scenario you would host Huginn on something other than a local desktop of course. You could then run Huginn natively on your chosen OS, in a VM or continue to run it as a container.
Ngrok
Ngrok is a tool that allows you to expose an internet accessible URL to other applications, Ngrok can then forward any HTTP traffic hitting that URL to a localhost endpoint. The reason we require Ngrok today is that you cannot configure Marketplacer webhooks to target localhost endpoints directly (in this case our instance of Huginn running in Docker), so we need some other mechanism to route this traffic.
Ngrok would not typically be required in production environments, or any environment where we could expose Huginn directly to the internet.
Docker
Docker is a platform that allows you to select from thousands of pre-packaged images and run them as containers. Images are pre-configured application templates e.g. Huginn, PostreSQL, Redis etc.
The reason we are using Docker today is that it allows us to quickly and easily spin up an instance of Huginn that would otherwise be much more difficult to set up and run natively on an OS.
Huginn
Huginn, (pronounced: hoo-gin), is an open source workflow automation tool that allows you to create agents to perform discrete items of work. Agents can accept and generate events (although this depends on the type of agent you are working with). You can then chain agents together to create scenarios. In our example we will work with 3 agents of different types:
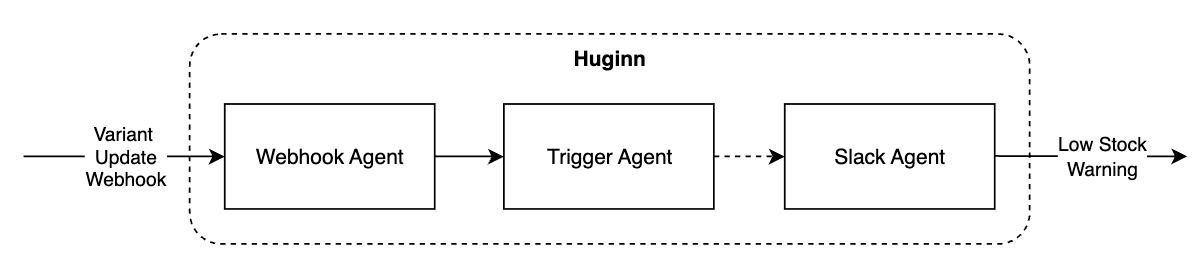
In the Scenario section we detail what each of these agents does.
Information: Huginn is positioned as an open-source, self-hosted alternative to SaaS offerings such as Zapier and IFTTT.
Slack
Slack is a messaging platform designed for remote teams. It allows users to communicate in real time (predominantly) using chat messages via channels, channels usually represent: teams, topics or projects.
Today we are going to send a low stock warning message (generated by Huginn) to a seller notifications channel.
Scenario
We’ve already mentioned our use case but let’s step through it end to end:
- We’ll change the stock position (
countOnHand) of a variant - This will cause the Marketplacer variant update webhook to fire (we will configure this webhook to point to an internet accessible URL provided by Ngrok)
- Ngrok will receive the webhook event and forward it to our instance of Huginn running in Docker
- A Huginn Webhook Agent will receive the inbound webhook and pass it to…
- A Huginn Trigger Agent - this will determine if the provided
countOnHandvalue for the variant is less than or equal to a threshold level, if so it will emit an event to… - A Huginn Slack Agent - this will format a compatible message structure for Slack and make a request to…
- A Slack app configured to receive messages. The low stock warning message will then be displayed in relevant Slack channel
Set up
So that we have the relevant dependencies in place, we’ll set up our systems in the following order.
Slack App
Starting at the end of the dependency chain, we’ll set up the Slack app that we’ll use to display messages in our chosen Slack channel.
Note: If you are using Slack within an enterprise environment, there is a chance that your ability to create apps is restricted by your IT team. You may therefore require assistance from them to complete these steps.
Creating the app
The steps to create an app capable of receiving an incoming post request (aka webhook) are as follows:
- Ensure you are signed into Slack
- Go to: https://api.slack.com/apps
- Select Create New App -> From Scratch
- Give your app a name and select the Workspace
- Select incoming Webhooks in the left-hand menu
- Activate incoming Webhooks, then click Add new webhooks to workspace
- Choose the channel where you want to post
- Obtain the Webhook URL generated by Slack, it should look similar to the following:
https://hooks.slack.com/services/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
Testing the app
At this point we can now test that our Slack app is working. You can use any tool you like to do this (Postman, Insomnia etc.) so long as it can generate HTTP POST requests with a JSON body.
We’ll use the command line tool cUrl to do this (you may need to install this if it’s not available on your system), indeed on the Incoming Webhooks page there is an example command you can copy and paste to use with cUrl, e.g.:
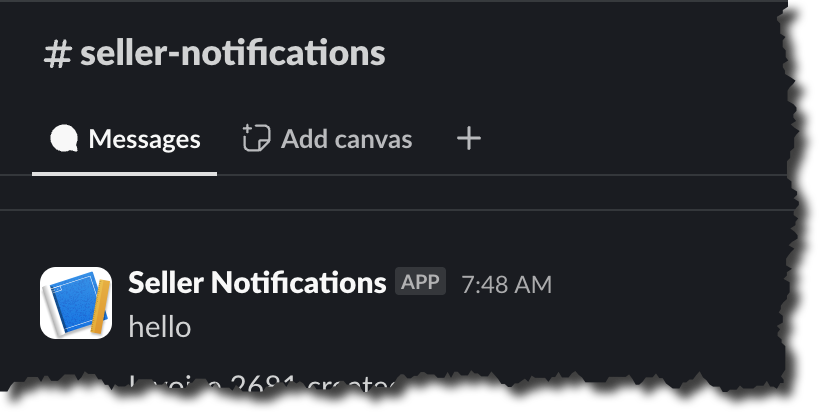
curl -X POST -H 'Content-type: application/json' --data '{"text":"hello"}' https://hooks.slack.com/services/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
This makes a POST request to our app using the following body payload:
{
    "text":"hello"
}
If successful, you should see “hello” appear in your Slack channel:
We’re finished with our Slack App for the moment, but we’ll be using the Webhook URL later when we configure Huginn.
Docker
Install Docker Desktop
First install Docker Desktop for your chosen desktop OS. We’ll not provide set up instructions here as the team at Docker have already done a great job of that.
Test Docker is running
Once you have installed Docker Desktop, check that it is running by typing the following at a command prompt:
docker ps
You should see something like this:
CONTAINER ID IMAGE COMMAND CREATED STATUS PORTS NAMES
Note: this command just asked Docker to list any running containers (apps), at this point you should not have any, but you should still get a non-error based response.
If this returns with an error response, then you’ve either:
- Not installed Docker Desktop
- Docker Desktop is not running
Important: If you experience an error here, you will need to remediate it before moving on.
Huginn - part 1
Running Huginn in Docker
As already mentioned we’re going to use Docker to host and run Huginn, specifically we are going to create a docker-compose file to contain the necessary config to get us up and running.
With this in mind, using your favorite text editor, (or if you don’t have a favorite - we’d suggest VS Code) create a new file called: docker-compose.yml and populate it as follows:
services:
  huginn:
    image: ghcr.io/huginn/huginn:latest
    restart: always
    ports:
      - "3000:3000"
This file simply tells Docker:
- Which image to use as a template in order to create a running (container) instance of Huginn.
- Whether the container should restart on failure
- The local to internal port assignment of the container
Save the file in a suitable location, and at a command prompt at that location type:
docker compose up -d
Docker will then use the contents of the docker-compose.yml file to spin up an instance of Huginn.
Note: If this is the first time you are doing this, Docker will download the image from a remote image repository which depending on your network connection may take up to a few minutes.
Assuming everything is successful you should see something similar to the following:
lesjackson@Less-MacBook-Pro-6 webhook_receiver % docker compose up -d
[+] Running 1/1
 ✔ Container webhook_receiver-huginn-1  Running                            0.0s
Configuring Huginn
At a web browser on the same machine as Docker Desktop, navigate to: http://localhost:3000/
Note: You may need to wait a few minutes for Huginn to start up for the first time, so if you get a: This site can’t be reached, or something similar - just wait a few more minutes then try again.
Login with the following credentials:
- Username: admin
- Password: password
After logging in, select Agents from the top menu to reveal that we have some pre-configured agents - don’t get too attached as we are going to delete them:
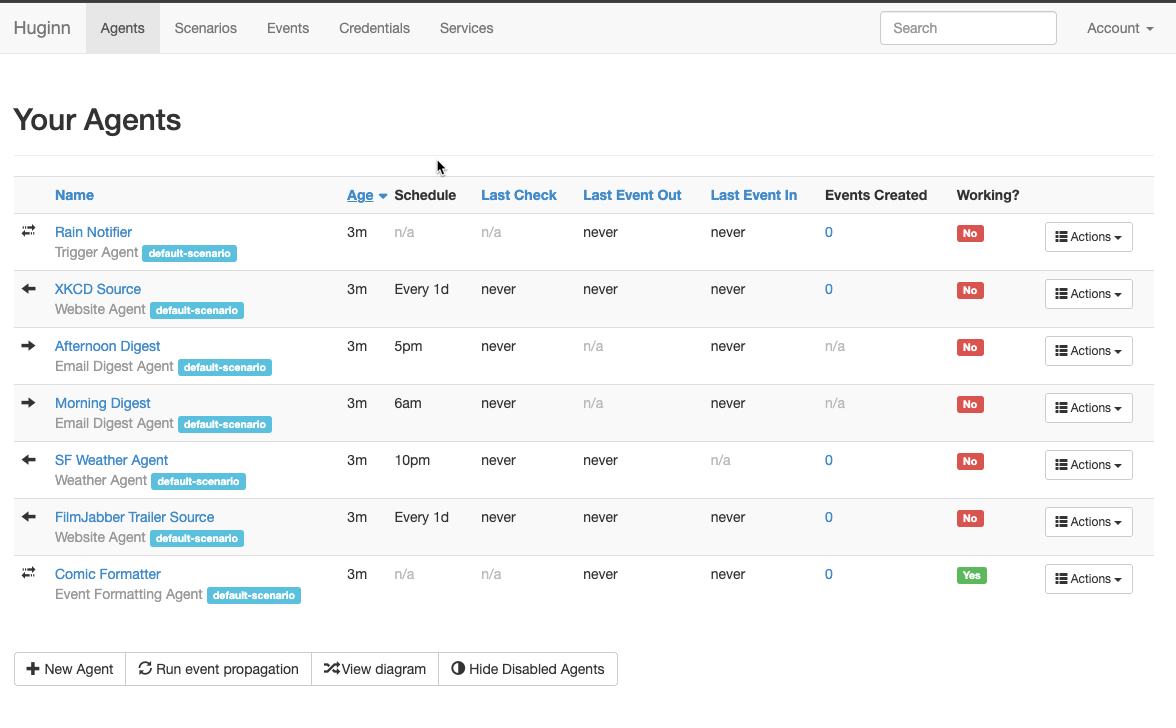
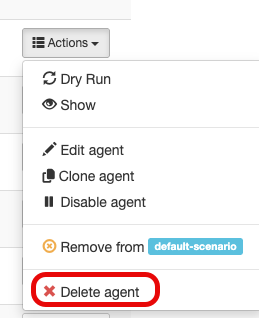
So that we can start from a clean slate, for each agent select Delete agent from the Actions menu as shown below:
Webhook agent
We’re going to create the first of our 3 Huginn agents, that being the Webhook agent. This agent is responsible for receiving the webhook from Marketplacer (passed to it via Ngrok), and cascading it to the Trigger agent.
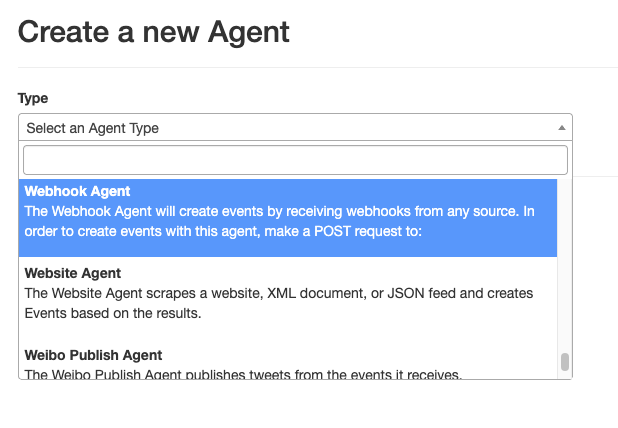
In the Agents menu, select New Agent, then select Webhook Agent from the list as shown below:
All you need to do here is give the agent a name, e.g.: Marketplacer variant webhook receiver then click Save.
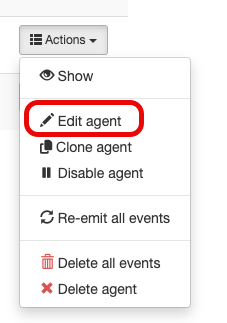
In order get the full URL that we can target this endpoint with, we need to open it again by selecting Edit agent from the Actions menu as shown below:
Here you will see the generated URL that we can use for this agent:
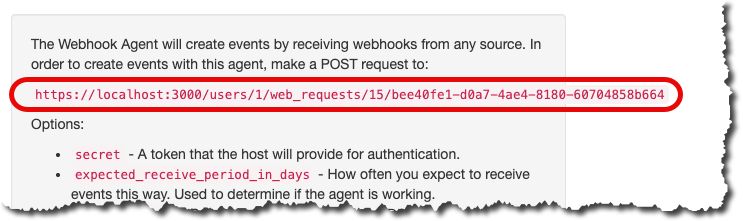
To test that this is working (and receiving traffic) we can make a direct call to the endpoint again using something like Postman, Insomnia, or in our case cUrl:
curl -X POST -H 'Content-type: application/json' --data '{"text":"hello"}' http://localhost:3000/users/1/web_requests/15/bee40fe1-d0a7-4ae4-8180-60704858b664
You should get a response similar to the following:
Event Created
Looking at the agent list in the Huginn admin portal you should see that this was successful:

Make a note of this URL as we’ll be using (part of) this when we come to configure the webhook in Marketplacer.
We’ll step away from Huginn for the moment, as in order to make sense of creating the remaining 2 agents, we need to work with a “real” webhook payload that is emitted from Marketplacer. Therefore, we need to move on to setting up Ngrok and the webhook in Marketplacer.
Ngrok
Security considerations
The whole point of using Ngrok today is to provide a publicly accessible URL that we can send traffic to. By enabling that type of functionality, we increase the attack surface for bad actors.
With this in mind, you will need to undertake your own assessment as to whether the use of Ngrok is right for you, or indeed if you are working on behalf of an organization, whether its use is permitted at all.
As with Docker, we won’t detail the full install and set up instructions for Ngrok as that is maintained and kept up to date here.
Static Vs Dynamic URLs
By default, when you start Ngrok it will generate a dynamic URL and expose that to the internet for use by your clients. Dynamic in this context means that if you stop Ngrok and restart it, the next URL you get will have changed. This clearly poses an issue when configuring clients that are using Ngrok (in this case that would be Marketplacer) as you would need to change the target URL in the client every time Ngrok restarts.
At the time of writing, Ngrok allowed users of their free offering to claim a static URL, meaning that the Ngrok URL presented won’t change upon restart. We suggest if this option is still available, then you opt in to this.
Having installed Ngrok, we simply want to start it and point it at our instance of Huginn, we do that by issuing the command below:
ngrok http --domain="my-static-domain.ngrok-free.app" http://localhost:3000
Here we are:
- Specifying that we want to use a static
domain- If you don’t provide this, then you will be issued with a dynamic URL - see call-out above.
- Directing traffic to:
http://localhost:3000- Note: that we only provide the host name and port (not any further parts of any routes)
If started successfully you should see something similar to the following:
Session Status                online
Account                       Les Jackson (Plan: Free)
Version                       3.22.1
Region                        Europe (eu)
Web Interface                 http://127.0.0.1:4040
Forwarding                    https://my-static-domain.ngrok-free.app -> http://localhost:3000

Connections                   ttl     opn     rt1     rt5     p50     p90
                              0       0       0.00    0.00    0.00    0.00
We can now test sending traffic to Ngrok to see whether it propagates through to our Huginn webhook agent:
The URL we need to provide to cUrl (and subsequently used when configuring the Marketplacer webhook) is comprised of 2 parts:
- The public hostname provided by Ngrok,
- e.g.:
https://my-static-domain.ngrok-free.app
- e.g.:
- The route to the Huginn Webhook agent,
- e.g.:
/users/1/web_requests/15/bee40fe1-d0a7-4ae4-8180-60704858b664
- e.g.:
So in our example the full URL would be:
https://my-static-domain.ngrok-free.app/users/1/web_requests/15/bee40fe1-d0a7-4ae4-8180-60704858b664
Plug this into cUrl (or whatever tool you are using) and make a POST request to it:
curl -X POST -H 'Content-type: application/json' --data '{"text":"hello"}' https://my-static-domain.ngrok-free.app/users/1/web_requests/15/bee40fe1-d0a7-4ae4-8180-60704858b664
You should get a response similar to the following:
Event Created
Retain this URL as we’ll be using next when we configure the webhook in Marketplacer
Assuming everything has worked as expected, we can now say that:
- Ngrok has been configured to send traffic from its publicly exposed endpoint to Huginn
- The Huginn Webhook Agent is working
Marketplacer webhook
We now want to set up a webhook in Marketplacer that will trigger when a variant is updated. We can set up this webhook as either:
- An operator - updated events will be emitted for every variant on the platform
- A Seller - update events will be emitted only for this sellers variants
In the context of this walk-through, there is no difference whether the webhook you create is for an operator or seller, indeed the decision will be based purely on your access level to the platform (operator or seller).
This article fully covers how to create a webhook in Marketplacer so we won’t repeat all those steps in detail here. Instead, we’ll just provide the values that you need to supply when creating your webhook.
- Webhook type: Variant
- Event name: Update
- URL: https://my-static-domain.ngrok-free.app/users/1/web_requests/15/bee40fe1-d0a7-4ae4-8180-60704858b664
- Note: Provided as an example only - substitute for your own url
- Enabled: True
- GraphQL: see below
query ($id: ID!) {
  node(id: $id) {
    ... on Variant {
      id
      legacyId
      countOnHand
    }
  }
}
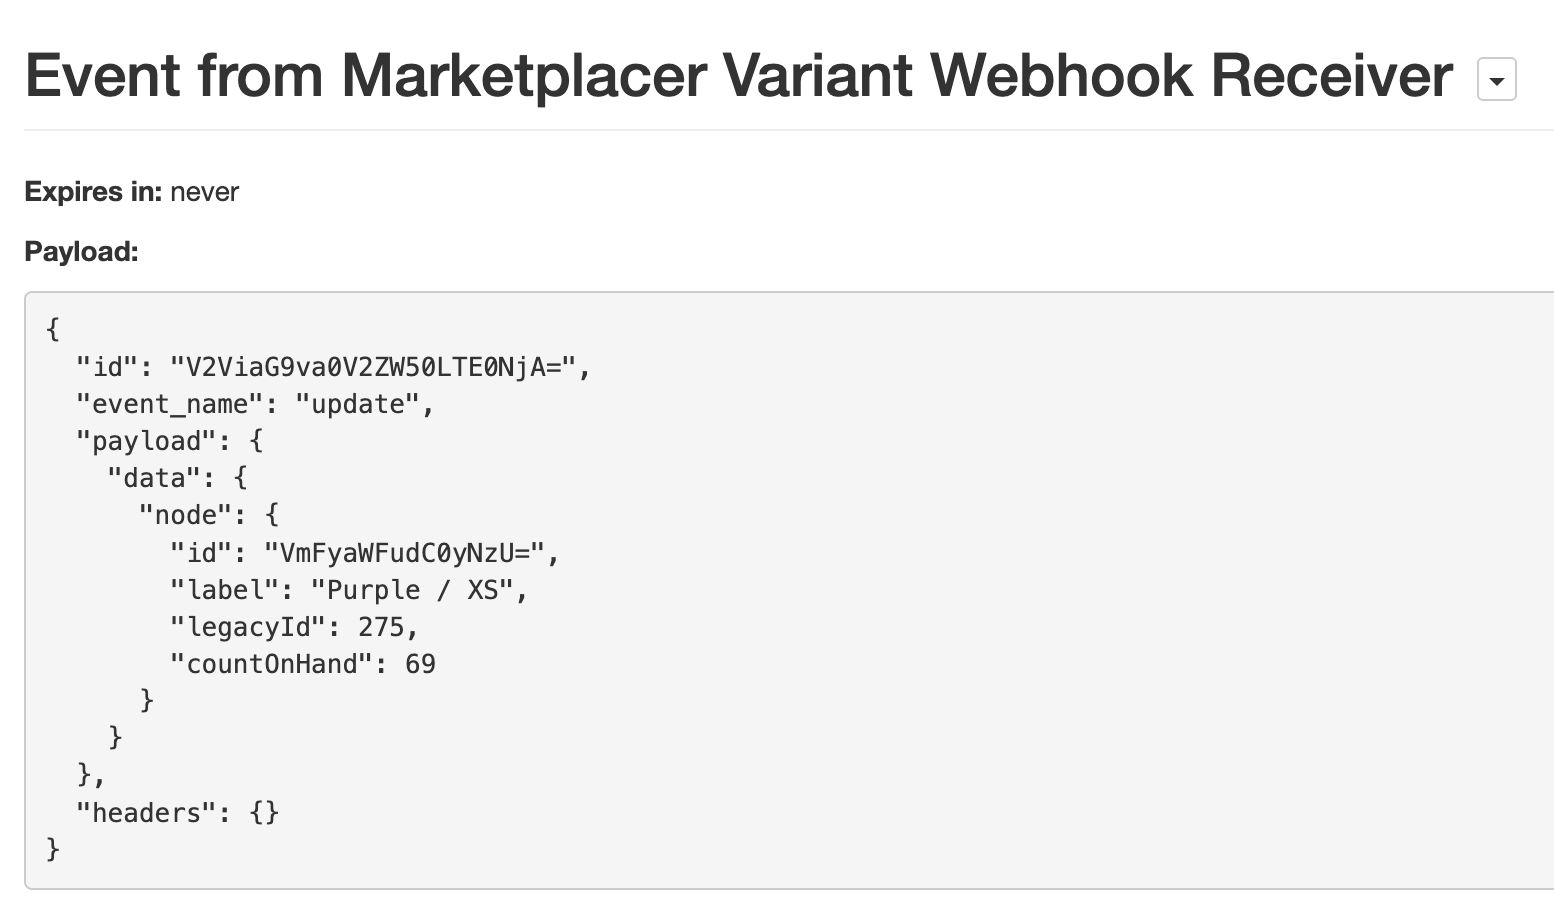
The GraphQL query describes what attributes we want to send with the webhook, in this case we are really interested in the value of countOnHand as this represent the stock holding of this variant and will be used by the Trigger Agent to determine if it issues a Low Stock Warning Event.
Updating a variant
Having created our webhook (make sure it’s enabled!) we can test it by editing a variant in some way, as any update will cause this webhook to fire.
The easiest way of doing this is to find a product (aka “Advert”) in the Seller Portal and edit one of the seller’s variants.
If you are an Operator, from the Operator Portal from the main menu you can select: Sellers -> Manage Sellers and click on the name of a Seller to be taken to their Seller Portal.
Once in the Seller Portal:
- Select: Products -> Manage Products -> View Product
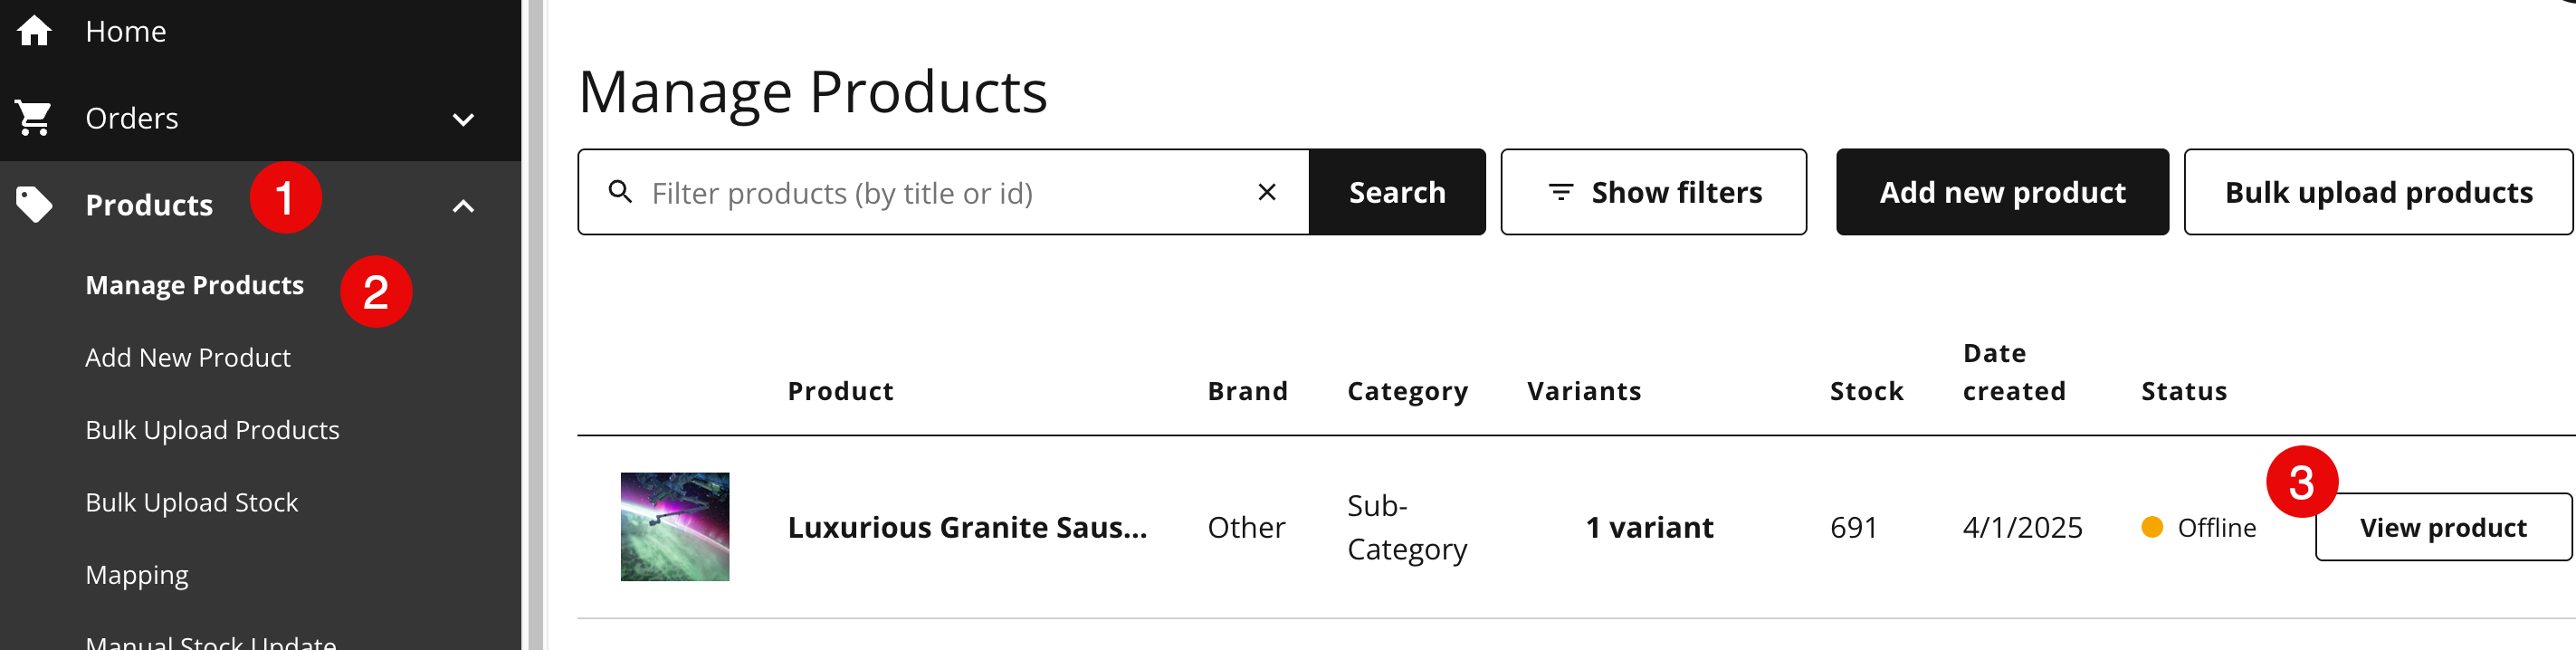
- Select the Variants Tab, and select the pencil icon (✏️) next to the variant you want to update:

You can then adjust any attribute on the variant to force an update event. Once you’ve changed something:
- Save the Variant
- Save changes on the product
Checking the webhook
We now want to ensure that Marketplacer emitted a webhook event. To do so, go to where you created the webhook in either the Operator or Seller portal and check for the events on the webhook:
- In the Operator Portal you do that by selecting the “+” sign next to the webhook
- In the Seller Portal you do that by selecting the “View Logs” button next to the webhook.
In the following example using the Operator Portal we can see that a Variant Update event was emitted successfully:
We should also see an entry on the Ngrok Console representing the request:
Session Status                online
Account                       Les Jackson (Plan: Free)
Version                       3.22.1
Region                        Europe (eu)
Latency                       23ms
Web Interface                 http://127.0.0.1:4040
Forwarding                    https://my-static-domain.ngrok-free.app  -> http://localhost:3000

Connections                   ttl     opn     rt1     rt5     p50     p90
                              1       0       0.00    0.00    0.03    0.03
HTTP Requests
-------------
15:05:01.096 BST POST /users/1/web_requests/10/bee40fe1-d0a7-4ae4-8180-60704858b664 201 Created
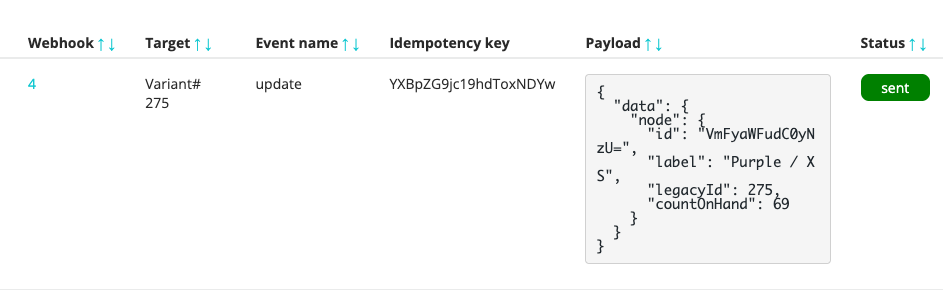
And finally we can look at the Webhook Agent in Huginn to see the events it has emitted (the emitted event should match what it has received by way of inputs). You can do this by:
- Selecting Agents from the main Huginn Portal menu
- Clicking the Events Created number for the Webhook agent

- Select Show Event for the emitted event:
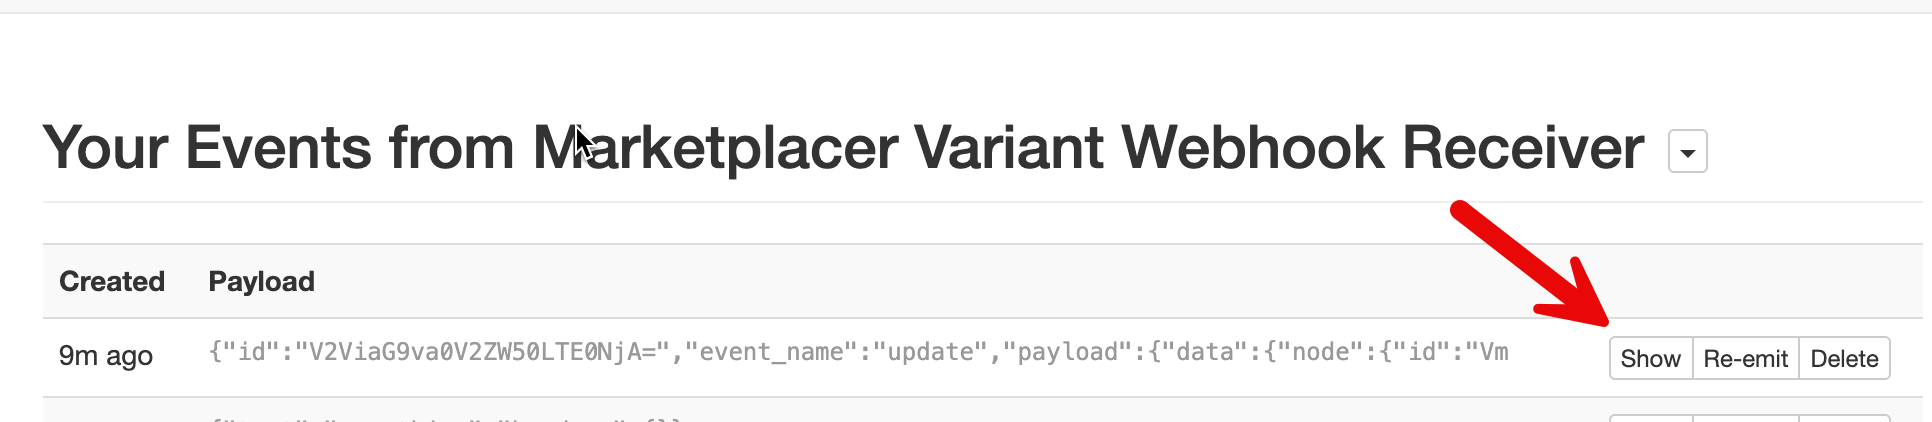
And you can see the emitted event payload:
At this point all we have left to do is to create the last 2 agents in Huginn to complete our end to end flow.
Huginn - part 2
Trigger agent
The next agent we want to set up is the Trigger Agent. This takes the payload from the Webhook Agent and determines whether the countOnHand value is below a certain threshold.
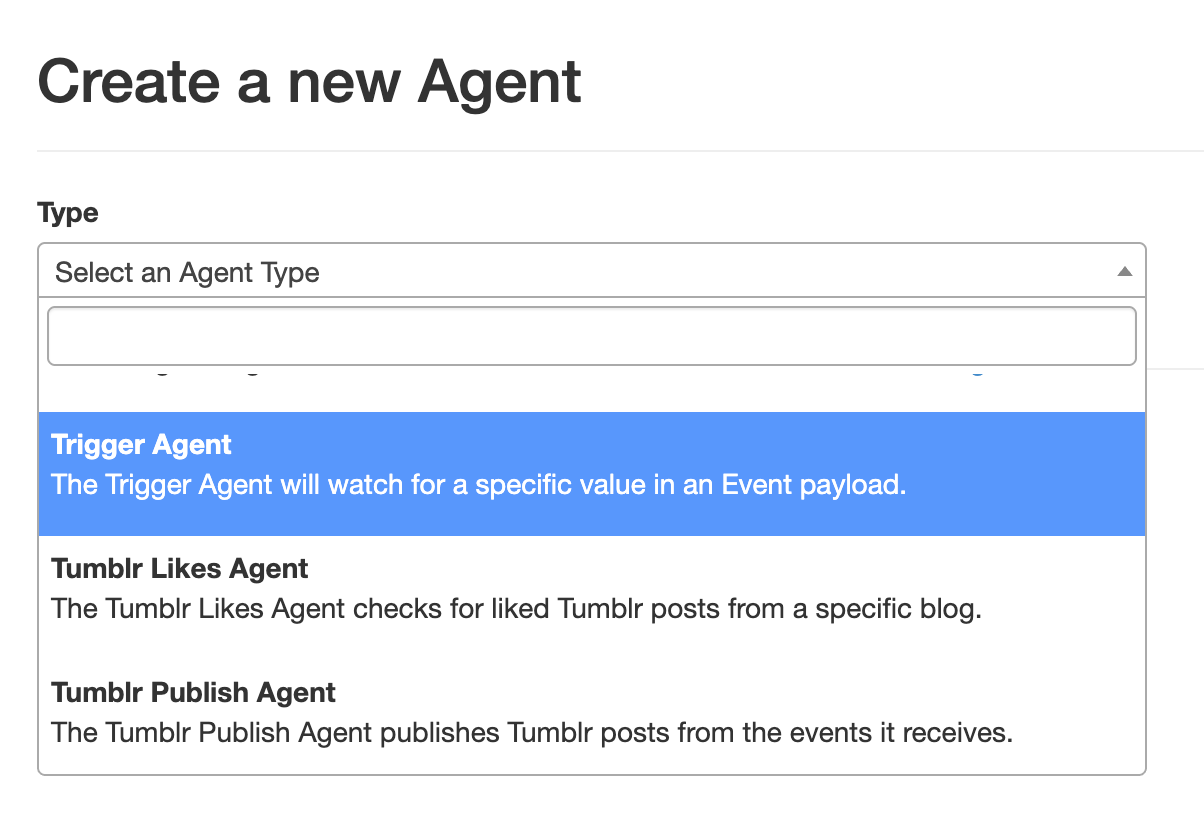
To create this agent, select New Agent from the Agents menu on the main Huginn menu, and select Trigger Agent
Populate the following fields:
- Name: E.g. Check Stock Level
- Sources: Enter the name of your webhook agent, e.g. Variant Webhook Receiver
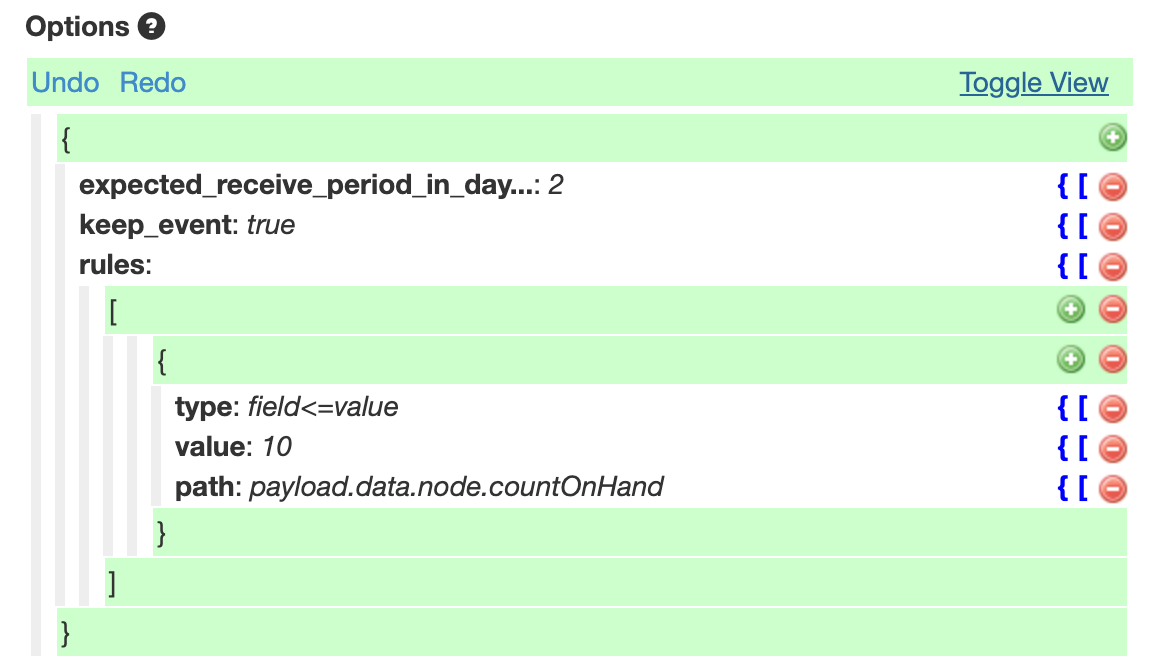
- Options: This is where we define our rule with the following values:
- keep_event: true
- rules:
- type: field<=value
- value: 10
- path: payload.data.node.countOnHand
The Options section should look something like this:
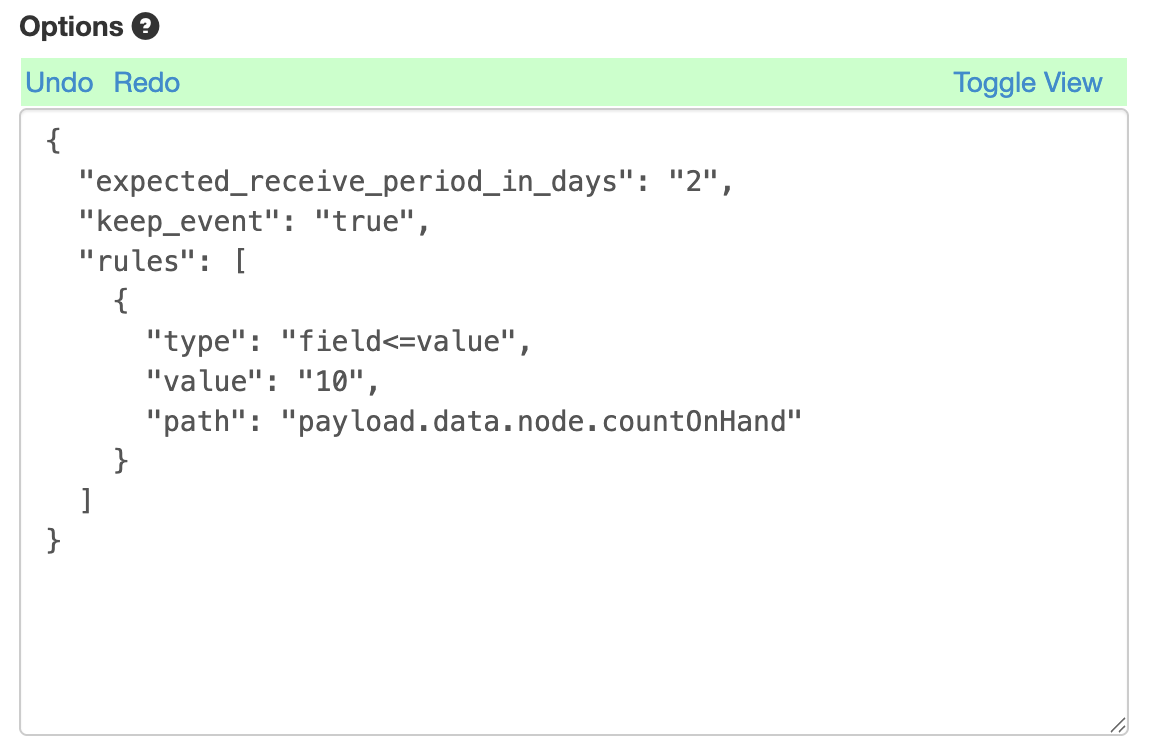
If you don’t like the default graphical view for options, you can toggle this to view the “raw” JSON:
Some points to note about the Options we have just defined:
- keep_event: This ensures that the data passed to this agent is persisted and passed on to the next consuming agent. We do want to make use of this payload in the Slack message we generate so it’s important we retain these values.
- rules
- type: We can define a range of rules, in this case we are just performing a less than or equal to operation
- value: This is the threshold value we have defined for determining low stock. I.e. if the countOnHand in the payload is less than or equal to 10 then this rule will trigger
- path: We expect to receive our payload as JSON, so this is the path to the
countOnHandfield in that payload.
Save this agent configuration, and we’ll move on to defining the Slack agent.
Slack agent
The last agent we’ll define is the Slack agent that will receive events from the Trigger agent should any be generated (remember the Trigger agent will only fire events if the rule we defined is met.)

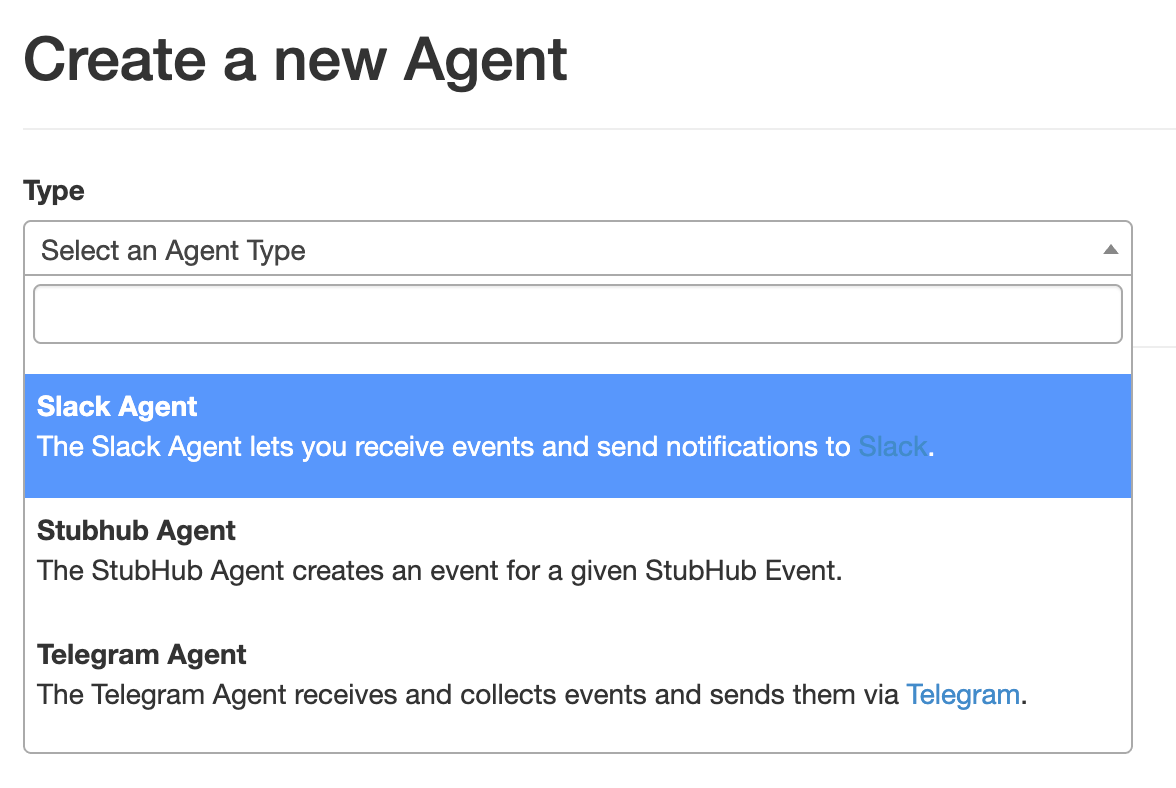
To create this agent, select New Agent from the Agents menu on the main Huginn menu, and select Slack Agent
Populate the following fields:
- Name: E.g. Send message to Slack
- Options: This is where we define our Slack endpoint and message
- webhook_url: This is the URL of the Slack app you created here
- channel: This is the name of the Slack Channel where you want the message to appear - again you specified this when you created the Slack app
- message: This is the message you want to appear in Slack, we’ll define it as:
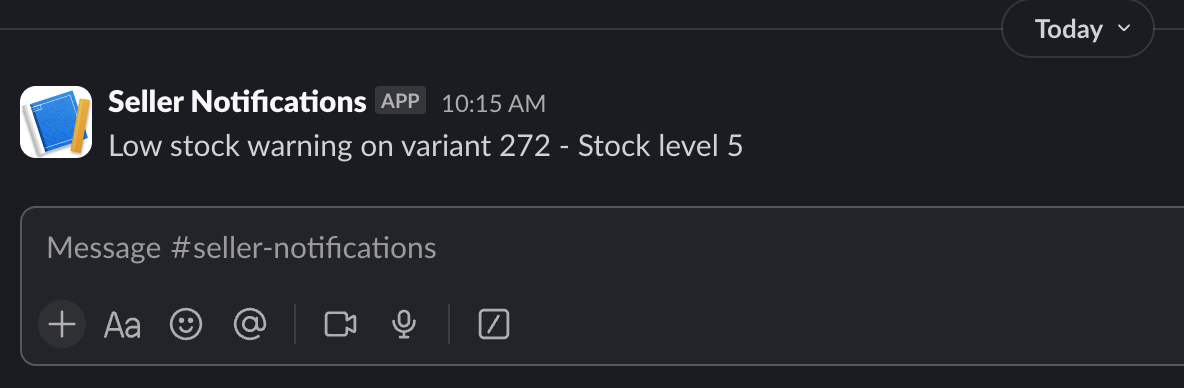
Low stock warning on variant {{payload.data.node.legacyId}} - Stock level {{payload.data.node.countOnHand}}
- icon: -empty-
Your defined Options should look like this (I’ve used the “raw” JSON view so you can see all the values):
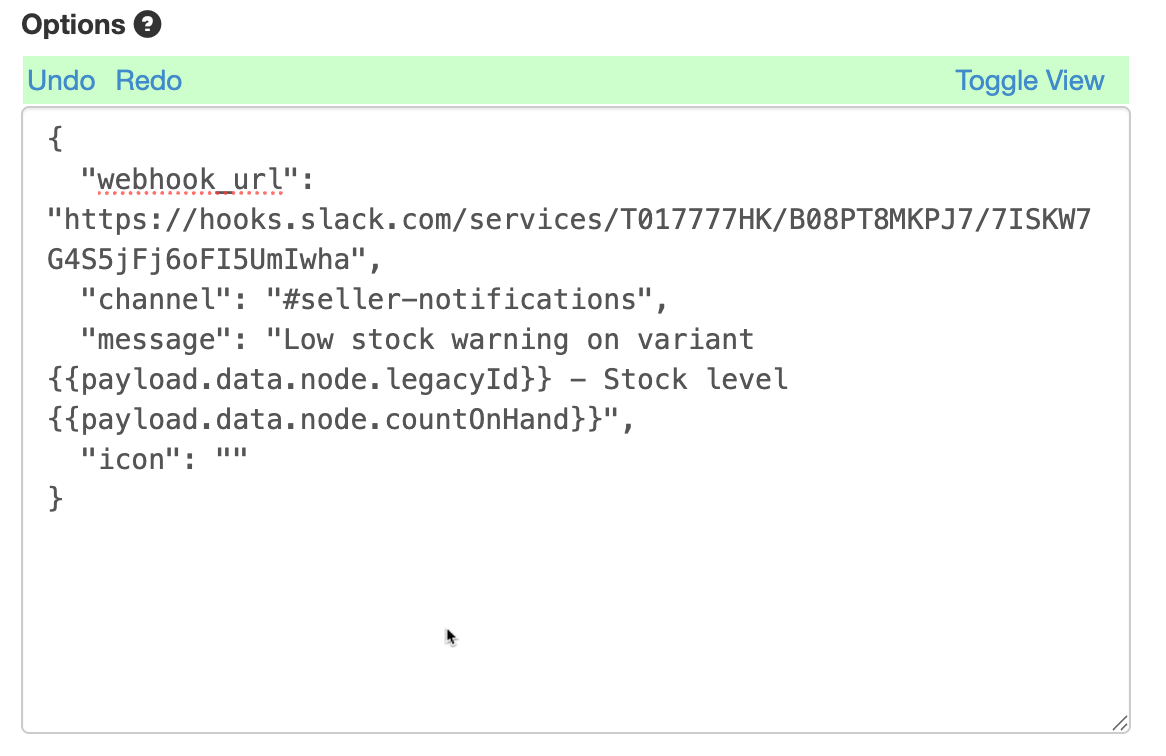
This configuration is straightforward, the only point of note is in relation to the message we defined:
Low stock warning on variant {{payload.data.node.legacyId}} - Stock level {{payload.data.node.countOnHand}}
You can see that we can inject variables into the message, these appear between a pair of double curly brackets: {{}}. We can then reference fields from the event payload, so to display the received countOnHand we reference it as: payload.data.node.countOnHand.
Save the agent, and we’re ready to perform an end to end test.
Testing
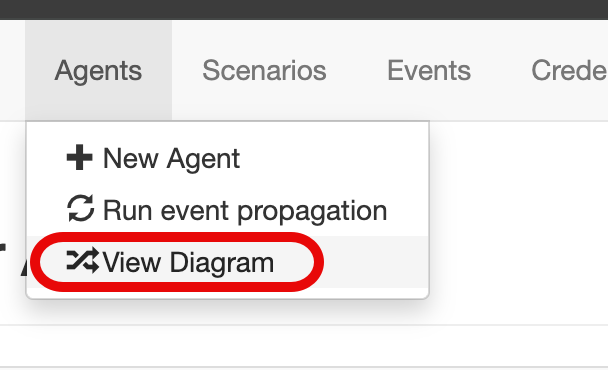
Before we move on to testing, let’s just check the Agent Event Flow to ensure that we have all our agents connected as we expect. To do this, select the View Diagram option from the Agents menu in Huginn:
This should display the agents and how events flow between them:
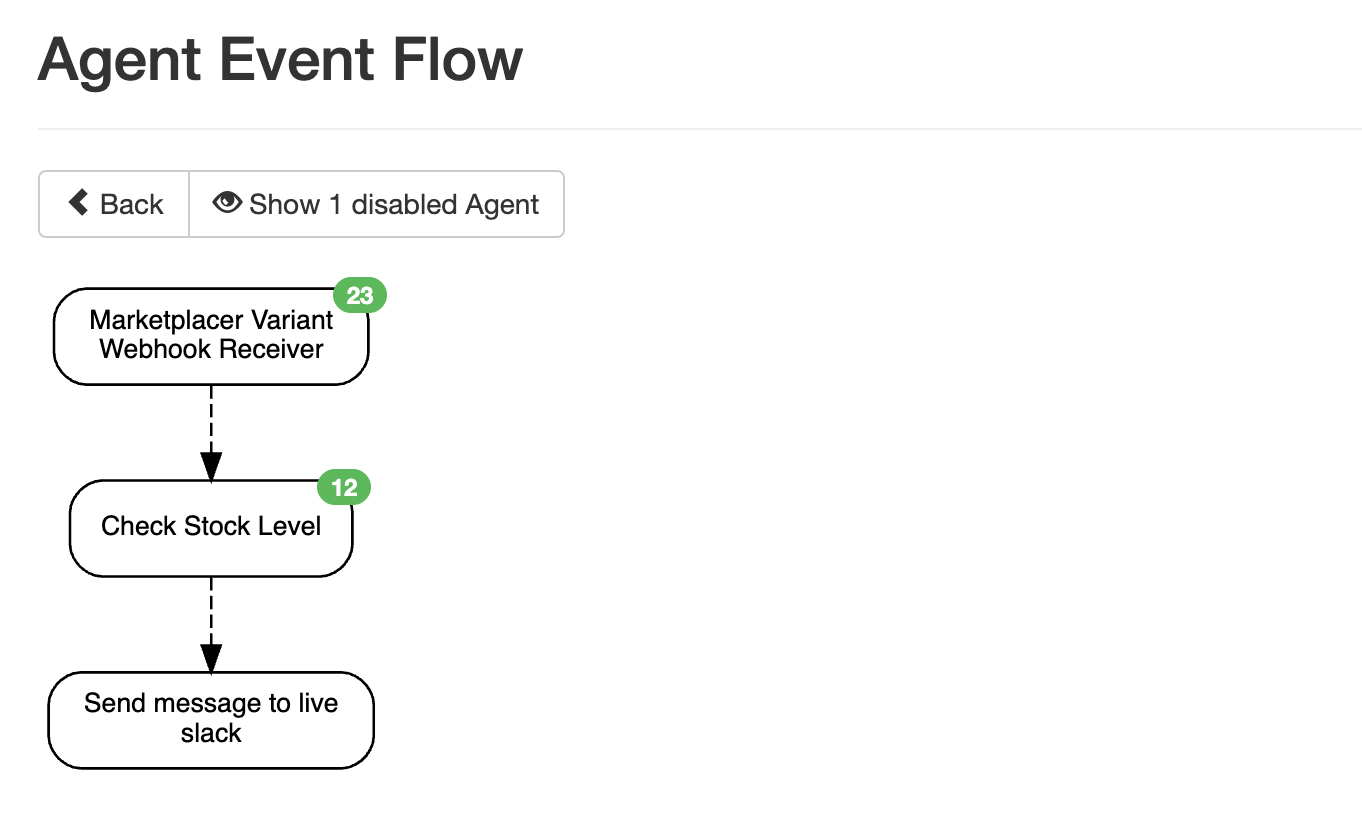
In the above example we can see everything is connected as we expect to achieve a full end-to-end flow.
As before, we want to generate an update event on a variant, so repeat the process we followed when we set up the webhook in Marketplacer, but be sure to update the Stock for the variant and set it to a level below the threshold value you set when configuring the Trigger Agent (in our example this was 10).
Assuming everything works as expected we should see a message (eventually!) appear in Slack:
Fault finding
As with all distributed applications there are a lot of moving parts, and therefore many places where the application can be misconfigured and fail. Fortunately Huginn provides a decent trace visibility of events. Below are some tips on checking the full end to end event flow from Marketplacer to Slack.
Markertplacer
- To check that webhook events are firing from Marketplacer, follow the step outlined here
- One other thing to check (if messages are not appearing in Slack) is to ensure that you have set the stock level for the variant to something less than or equal to the threshold value in the trigger function.
Ngrok
- Ngrok provides console view of inbound traffic along with any error responses it receives, so check this out to make sure traffic is flowing through.
- Double check that you are forwarding traffic to the correct local endpoint, including the port, and whether the endpoint is HTTP or HTTPS (in our example it’s HTTP)
Huginn
- You can check the events emitted and received by agents using the Huginn Admin Portal - this is useful to help you trace events through the platform
Slack
- The best way to check this is working is to directly make a POST request to the Slack app using a tool like Postman or cURL, we covered using cUrl here.