Start Here
6 minute read
What you’ll learn
In this walkthrough we’ll build a simple Connected Integration into commercetools using Microsoft Azure, specifically we will:
- Move newly created products from Marketplacer to commercetools
- Move newly created orders from commercetools to Marketplacer
Companion Video
The companion video for this section can be found here.Things to consider
Before we launch into the build, here are some things to consider about this example:
- This solution is intended for training and education purposes only
- We are using Microsoft Azure to host the main integration components, but any other cloud or on-prem platform could be used
- We are using commercetools as the eCommerce platform in this example, but any other eCommerce solution with an appropriate API could be used
- We are using a predominantly “event-based” approach to the movement of data between Marketplacer and commercetools, other approaches are also possible.
Note
The reader should be aware that provisioning services on Azure may have associated costs which would be borne by the account holder.Solution Overview
Connected Integration Recap
A quick recap on the key data flows in a Connected Integration are shown below:

While there are many more data flows in a typical Connected Integration, the primary flows involve:
- Moving 3rd party seller products from Marketplacer, through on to the operators frontend eCommerce platform for sale
- Moving orders raised on the the frontend eCommerce platform back through to Markerplacer so that the sellers can fulfil those orders
Further Reading
The remainder of this article is centered on the technical build of a Connected Integration, focused on the Product and Order flows. For more detailed information on Connected Integrations as a whole, please take a look at the Connected Integration Blueprint.High level solution architecture
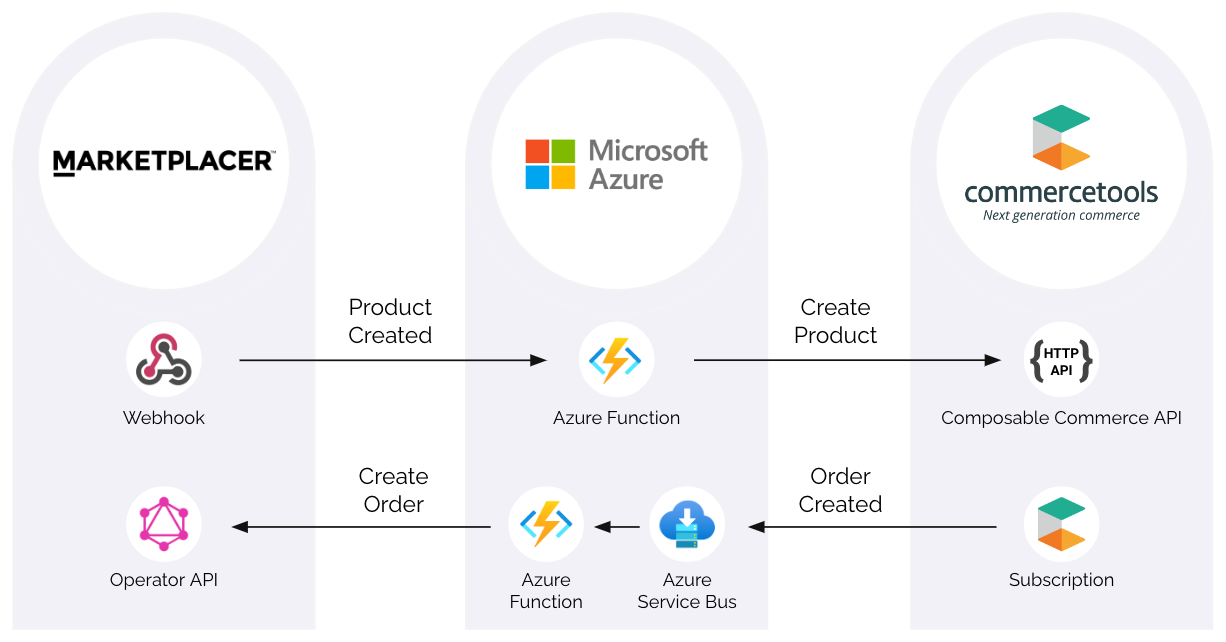
The solution we are going to build is illustrated below:

We’ll build or use each of the following solution components in order:
1. Marketplacer - Product Created Webhook
We’ll set up a webhook on Marketplacer to emit a product created event, this manifests as a HTTP POST Request with a JSON payload that we’ll send to the Azure Http trigger function. The JSON payload will contain some simple product attributes that we’ll use to create a product in commercetools.
2. Microsoft Azure - HTTP Trigger Function
The HTTP Trigger Function is used as the webhook endpoint. Upon receipt of a HTTP POST request, the function will use the received payload contents to make a call to the commercetools Composable Commerce Product Create API endpoint.
3. commercetools - Composable Commerce API
The Azure HTTP Trigger function uses this API to create a simple Product in commercetools. We’ll explore and test this API, before integrating with our Azure function which will allow us to create a Product in Marketplacer and flow it through to commercetools.
4. Microsoft Azure - Azure Service Bus
An Azure Service Bus will be used as the transport for Order Created events from commercetools to Marketplacer, we will need to create an Azure Bus instance in order to make use of commercetools subscriptions.
5. commercetools - Order Created Subscription
To facilitate an event-based order flow from commercetools to Marketplacer, we will utilize a commercetools subscription. Subscriptions place messages directly on to a messaging system of your choice, in this case we will subscribe to order creation messages and place them on to an Azure Service Bus that we created in the previous section.
6. Microsoft Azure - Service Bus Trigger Function
In order to call the Marketplacer orderCreate GraphQL mutation, we’ll employ another Azure Function, this time the function will trigger on Azure Service Bus events. This function will perform some validations on the payload from commercetools, as well as attaching the commercetools order id to the Marketplacer order as an external id. We’ll then place an order in commercetools and flow it all the way through to Marketplacer.
Environment Set Up
To streamline the walk-through, we won’t repeat content that has been documented already, however if you want to follow along it is advised that you have set up the following:
Marketplacer
- Admin Login account: you should be able to login here:
- https://<your instance name>.marketplacer.com/administration
- Set up an Operator API Key - instructions here
Reach out to your Marketplacer Technical Account or Customer Success Manager to obtain your instance name or login id if you are having difficulty.
commercetools
- You will need to set up an API client - instructions here
If you are setting up a new instance of commercetools we’d suggest that you opt to use the sample project as we will be making use of the products in this project.
Azure
- You will need to have an account on Azure - Get one here
- Note: Provisioning services on Azure may have an associated cost that will be borne by the account holder
VS Code
- We will be authoring our Azure Functions using VS Code, so in order to use this model you will need to:
- Download and install VS Code
- Install Node.JS - this is required for the dependencies that allow us to run Azure Functions locally
- Install the Azure Functions extensions for VS Code
- Once the extension is installed, click on the Azure logo the Activity Bar. Under Azure: Functions, click Sign into Azure… and follow the on screen instructions
Insomnia API Client (Optional)
We may make direct calls to the various API endpoints throughout this walkthrough, in which case we will be using the Insomnia API client. Instructions on how to set this up with the Marketplacer Operator API can be found here.
Comparing Data Models
As we will be working with Products and Orders in both Marketplacer and commercetools, it’s worth taking a look at the high-level data models for each.
Products
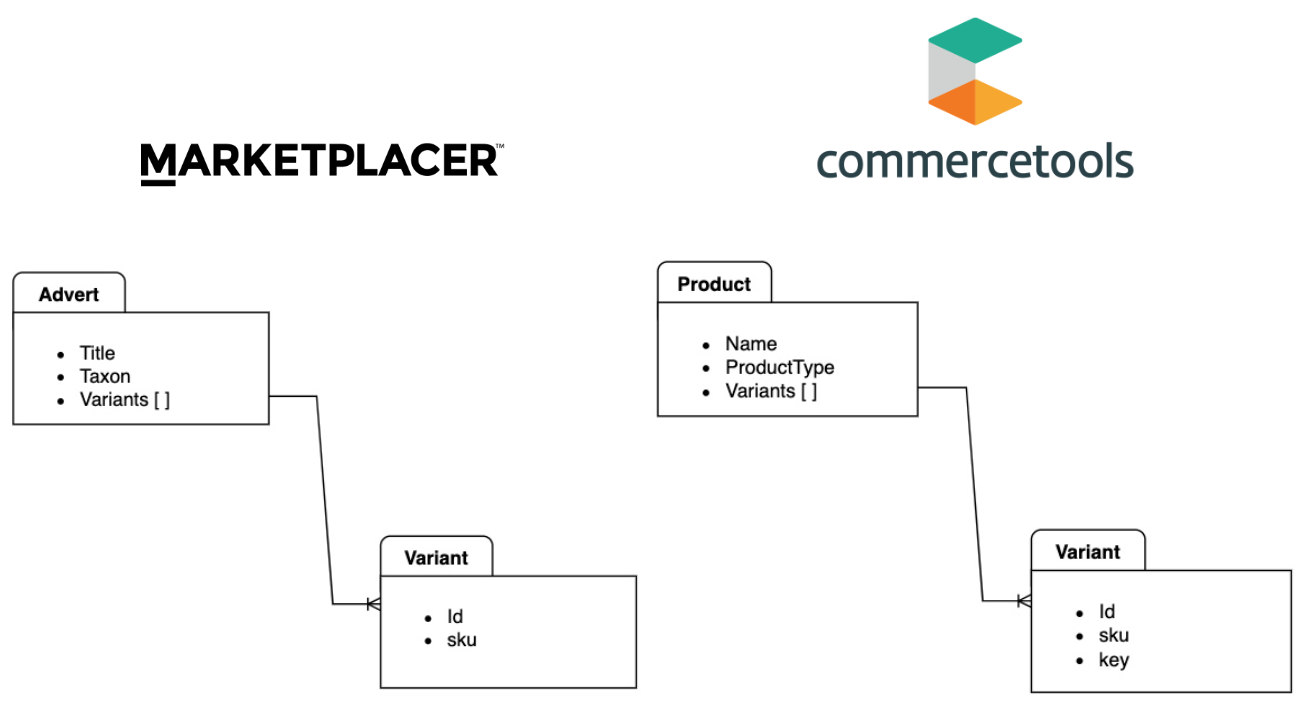
A simplified view of the product model for each platform is shown below:

The key takeaways are:
- Products in Marketplacer are called Adverts
- Adverts in Marketplacer are analogous to Products in commercetools
- Both product models support the concept of Variants
- Variants in both platforms are the entity that is purchased
- We will use the
keyattribute on the commercetools variant to hold the Marketplacer variant id- This will facilitate the order creation process in Marketplacer
Orders
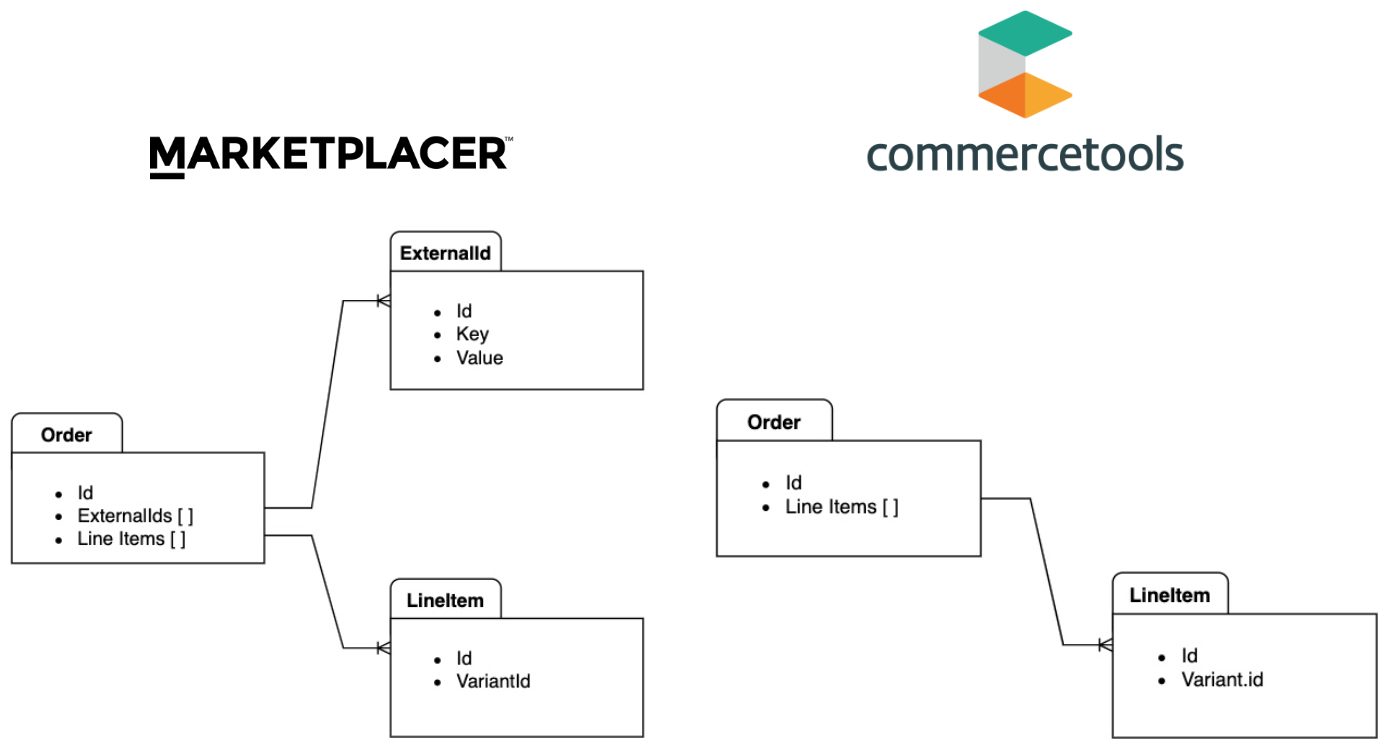
A simplified view of the order model for each platform is shown below:

The key takeaways are:
- Both models have an Order entity with associated Line Items
- We will attach the commercetools order Id as an
ExternalIdto the Marketplacer order to create a “connection” between the 2 order entities
Build Steps
We have 6 major build phases to perform, in subsequent sections we’ll step through and complete each one in turn.
Next Up: Webhook Setup